Skip to content

re-ws.pl

ReverseEngineering WorkStation

  • Home
  • Tutorials
  • Random
  • About

Tag: software

Setting up new v3 Hidden Service with ultimate security: Part 3: Client Authentication

Posted on February 27, 2018 - January 6, 2019 by Kamil (aka. v3l0c1r4pt0r)
Secure Card icon

This post is a part of Tor v3 tutorial. Other parts are:

  1. Hidden Service setup
  2. PKI and TLS
  3. Client Authentication
  4. Installing client certificates to Firefox for Android

As we now have working Public Key Infrastructure, we are ready to use it for more than encrypting traffic (which is already encrypted by Tor). We can very easily turn on client verification on our server. This will prevent anybody not having valid certificate issued by us from visiting our hidden webpage – just in case hiding domain name in hidden services version 3 leaks the name somehow (which should not happen anymore in v3). In this part we will issue client certificate (the procedure is almost identical to server certificate), then configure httpd to require client identification and finally configure Firefox to try sending the certificate. Let’s go!

Issuing user certificate

In my case tmp directory emulated client machine and ca is my Cerificate Authority, which issues certificates. We start by creating request on client side, then sign it on CA side.

$ mkdir tmp
$ cd tmp
$ openssl genrsa -out v3l0c1r4pt0r@gmail.com.key.pem 4096
Generating RSA private key, 4096 bit long modulus
........++
..............................................++
e is 65537 (0x010001)
$ openssl req -config ../ca/intermediate/openssl.cnf -key v3l0c1r4pt0r@gmail.com.key.pem -new -sha256 -out v3l0c1r4pt0r@gmail.com.csr.pem
You are about to be asked to enter information that will be incorporated
into your certificate request.
What you are about to enter is what is called a Distinguished Name or a DN.
There are quite a few fields but you can leave some blank
For some fields there will be a default value,
If you enter '.', the field will be left blank.
-----
Country Name (2 letter code) [GB]:PL
State or Province Name [England]:lodzkie
Locality Name []:
Organization Name [Alice Ltd]:r4pt0r Test Systems
Organizational Unit Name []:
Common Name []:v3l0c1r4pt0r@gmail.com
Email Address []:v3l0c1r4pt0r@gmail.com
$ chmod 400 v3l0c1r4pt0r@gmail.com.*.pem
$ cp v3l0c1r4pt0r@gmail.com.csr.pem ../ca/intermediate/csr/
$ cd ../ca
$ openssl ca -config intermediate/openssl.cnf -extensions usr_cert -days 375 \
> -notext -md sha256 -in intermediate/csr/v3l0c1r4pt0r@gmail.com.csr.pem \
> -out intermediate/certs/v3l0c1r4pt0r@gmail.com.cert.pem
Using configuration from intermediate/openssl.cnf
Enter pass phrase for /home/r4pt0r/Research/cubie/newtor/ca/intermediate/private/intermediate.key.pem:
Check that the request matches the signature
Signature ok
Certificate Details:
        Serial Number: 4097 (0x1001)
        Validity
            Not Before: Feb 27 17:14:40 2018 GMT
            Not After : Mar  9 17:14:40 2019 GMT
        Subject:
            countryName               = PL
            stateOrProvinceName       = lodzkie
            organizationName          = r4pt0r Test Systems
            commonName                = v3l0c1r4pt0r@gmail.com
            emailAddress              = v3l0c1r4pt0r@gmail.com
        X509v3 extensions:
            X509v3 Basic Constraints:
                CA:FALSE
            Netscape Cert Type:
                SSL Client, S/MIME
            Netscape Comment:
                OpenSSL Generated Client Certificate
            X509v3 Subject Key Identifier:
                ED:24:E6:FF:1D:9B:61:AC:29:66:39:59:FB:5D:77:25:F7:A3:55:47
            X509v3 Authority Key Identifier:
                keyid:3D:AC:8E:21:79:5A:AD:7B:7C:92:92:65:B7:19:D0:E8:00:0E:50:70

            X509v3 Key Usage: critical
                Digital Signature, Non Repudiation, Key Encipherment
            X509v3 Extended Key Usage:
                TLS Web Client Authentication, E-mail Protection
Certificate is to be certified until Mar  9 17:14:40 2019 GMT (375 days)
Sign the certificate? [y/n]:y


1 out of 1 certificate requests certified, commit? [y/n]y
Write out database with 1 new entries
Data Base Updated
$ cd ../tmp
$ cp ../ca/intermediate/certs/v3l0c1r4pt0r@gmail.com.cert.pem ./
$ openssl pkcs12 -export -inkey v3l0c1r4pt0r@gmail.com.key.pem -in v3l0c1r4pt0r@gmail.com.cert.pem -out v3l0c1r4pt0r@gmail.com.p12
Enter Export Password:
Verifying - Enter Export Password:

Last step was packaging certificate and key into PKCS#12 container. That is for securing key (we can encrypt it with password), and is a form required by Firefox. After creation of .p12 (and verifying it is fine), we can (and SHOULD) delete source files, as they are not protected in any way.

Configuring httpd to require user certificate

To enforce client verification, following lines must be added to virtual host configuration, in our case it might go just after SSL certificate file paths.

    SSLVerifyClient require
    SSLVerifyDepth 2

We have to reload httpd for changes to take effect.

Installing certificate to Firefox

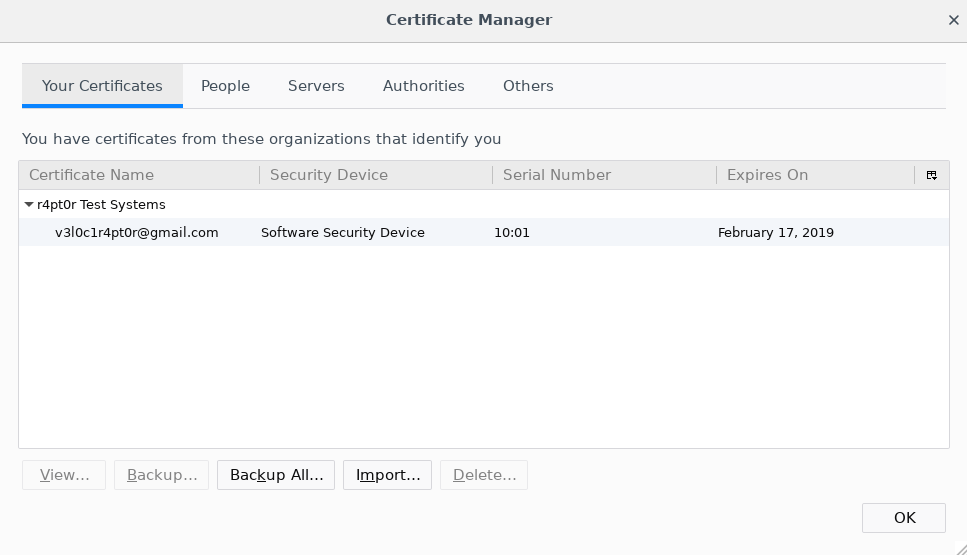
At last, to start using newly generated certificate, we should install it to Firefox. The procedure is similar to the one with CA certificate. We need to open Certificate Manager window. Then, instead of going to Authorities, we go to Your Certificates. Then we click on Import and select .p12 file.

Firefox Certificate Manager
Certificate Manager / Your Certificates

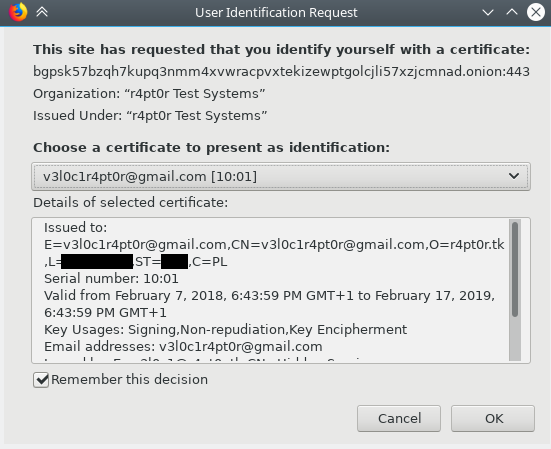
If the file has password, Firefox will ask for it and after successfully reading the content. If everything went well, you should see your certificate on the list. Now we can try connecting to our hidden service. We should see the window like this:

Firefox - User Identification Request
Server asks for client’s identity

Finally, after confirmation, you should see your hidden service content. Congrats!

Posted in Setting up new v3 Hidden Service with ultimate security, TutorialsTagged English, Linux, PKI, software, tor, X.509Leave a comment

Setting up new v3 Hidden Service with ultimate security: Part 2: PKI and TLS

Posted on February 20, 2018 - January 6, 2019 by Kamil (aka. v3l0c1r4pt0r)
KGPG icon

This post is a part of Tor v3 tutorial. Other parts are:

  1. Hidden Service setup
  2. PKI and TLS
  3. Client Authentication
  4. Installing client certificates to Firefox for Android

After setting up working Tor hidden service, the next step to ultimate security is having properly implemented Public Key Infrastructure (PKI). For this step, there are a lot of tutorials already existing and there is not much that needs to be added to them. Personally, I was using tutorial available here for the second time now and I find it very well-written. Because I am going to follow this tutorial, I will just post commands that have to be executed.

Before starting, I have to add one important remark. To make our PKI really secure one, it is crucial to have root CA air-gapped, that is device, on which it will be generated should be disconnected permanently from the internet. Good candidate for such a device might be some old laptop or Raspberry Pi Zero, as it lacks Ethernet port and anything reasonable to connect to internet. It is also important to store generated certificate in a safe place and secure it with strong non-dictionary password, which will be saved only in our mind.

If the requirements are fulfilled, we can start the setup. Below are commands to type as well as output from them, for easier determination of whether the commands were successful or not.

Preparations

At first, we need to create following directory structure:

ca
├── [drwxr-xr-x]  certs
├── [drwxr-xr-x]  crl
├── [-rw-r--r--]  index.txt
├── [drwxr-xr-x]  intermediate
│   ├── [drwxr-xr-x]  certs
│   ├── [drwxr-xr-x]  crl
│   ├── [drwxr-xr-x]  csr
│   ├── [-rw-r--r--]  index.txt
│   ├── [drwxr-xr-x]  newcerts
│   ├── [drwx------]  private
│   └── [-rw-r--r--]  serial
├── [drwxr-xr-x]  newcerts
├── [drwx------]  private
└── [-rw-r--r--]  serial

And file content is (enclosed between pipe symbols: |):

./index.txt: ||
./intermediate/index.txt: ||
./intermediate/serial: |1000
|
./serial: |1000
|

Then, we need to save this file into root/openssl.cnf and this file into root/intermediate/openssl.cnf. Inside them, the only thing that have to be changed is dir property in CA_default section. Use absolute path to your directory.

Root CA

Note: when giving values for certain fields, better give some country, state (I have just checked it’s necessary), ON, most importantly, Common Name and e-mail. Just in case some program will check if they exists.

$ openssl genrsa -aes256 -out private/ca.key.pem 8192
Generating RSA private key, 8192 bit long modulus
.................++
....++
e is 65537 (0x010001)
Enter pass phrase for private/ca.key.pem:
Verifying - Enter pass phrase for private/ca.key.pem:
$ chmod 400 private/ca.key.pem
$ openssl req -config openssl.cnf -key private/ca.key.pem -new -x509 -days 7300 \
> -sha256 -extensions v3_ca -out certs/ca.cert.pem
Enter pass phrase for private/ca.key.pem:
You are about to be asked to enter information that will be incorporated
into your certificate request.
What you are about to enter is what is called a Distinguished Name or a DN.
There are quite a few fields but you can leave some blank
For some fields there will be a default value,
If you enter '.', the field will be left blank.
-----
Country Name (2 letter code) [GB]:PL
State or Province Name [England]:lodzkie
Locality Name []:
Organization Name [Alice Ltd]:r4pt0r Test Systems
Organizational Unit Name []:
Common Name []:r4pt0r Root CA
Email Address []:admin@example.com
$ chmod 444 certs/ca.cert.pem
$ openssl x509 -noout -text -in certs/ca.cert.pem
Certificate:
    Data:
        Version: 3 (0x2)
        Serial Number:
            9a:16:72:e8:ac:81:cd:be
    Signature Algorithm: sha256WithRSAEncryption
        Issuer: C = PL, ST = lodzkie, O = r4pt0r Test Systems, CN = r4pt0r Root CA, emailAddress = admin@example.com
        Validity
            Not Before: Feb 20 17:22:27 2018 GMT
            Not After : Feb 15 17:22:27 2038 GMT
        Subject: C = PL, ST = lodzkie, O = r4pt0r Test Systems, CN = r4pt0r Root CA, emailAddress = admin@example.com
        Subject Public Key Info:
            Public Key Algorithm: rsaEncryption
                Public-Key: (8192 bit)
                Modulus:
                    00:dd:8c:8f:5d:be:f4:0f:63:91:9c:73:bf:a8:17:
<quite a lot of data>
                    6d:c1:3f:5c:05
                Exponent: 65537 (0x10001)
        X509v3 extensions:
            X509v3 Subject Key Identifier:
                29:53:8A:D2:ED:CF:35:C2:BB:A8:12:06:01:74:99:A3:B8:E5:DC:FE
            X509v3 Authority Key Identifier:
                keyid:29:53:8A:D2:ED:CF:35:C2:BB:A8:12:06:01:74:99:A3:B8:E5:DC:FE

            X509v3 Basic Constraints: critical
                CA:TRUE
            X509v3 Key Usage: critical
                Digital Signature, Certificate Sign, CRL Sign
    Signature Algorithm: sha256WithRSAEncryption
         a9:6d:9e:d4:bf:1b:55:d8:f0:b5:e9:9d:56:e8:58:04:d6:c3:
<quite a lot of data>
         89:50:26:4f:3e:93:95:06:c7:38:08:c7:16:0e:d2:a2

Intermediate CA

$ openssl genrsa -aes256 -out intermediate/private/intermediate.key.pem 8192
Generating RSA private key, 8192 bit long modulus
.++
........................................................................................................................................................................................................................................................................................++
e is 65537 (0x010001)
Enter pass phrase for intermediate/private/intermediate.key.pem:
Verifying - Enter pass phrase for intermediate/private/intermediate.key.pem:
$ chmod 400 intermediate/private/intermediate.key.pem
$ openssl req -config intermediate/openssl.cnf -new -sha256 \
> -key intermediate/private/intermediate.key.pem -out intermediate/csr/intermediate.csr.pem
Enter pass phrase for intermediate/private/intermediate.key.pem:
You are about to be asked to enter information that will be incorporated
into your certificate request.
What you are about to enter is what is called a Distinguished Name or a DN.
There are quite a few fields but you can leave some blank
For some fields there will be a default value,
If you enter '.', the field will be left blank.
-----
Country Name (2 letter code) [GB]:PL
State or Province Name [England]:lodzkie
Locality Name []:
Organization Name [Alice Ltd]:r4pt0r Test Systems
Organizational Unit Name []:
Common Name []:r4pt0r Intermediate CA
Email Address []:admin@example.com
$ openssl ca -config openssl.cnf -extensions v3_intermediate_ca -days 3650 \
> -notext -md sha256 -in intermediate/csr/intermediate.csr.pem -out intermediate/certs/intermediate.cert.pem
Using configuration from openssl.cnf
Enter pass phrase for ca/private/ca.key.pem:
Can't open ca/index.txt.attr for reading, No such file or directory
140341269315520:error:02001002:system library:fopen:No such file or directory:crypto/bio/bss_file.c:74:fopen('ca/index.txt.attr','r')
140341269315520:error:2006D080:BIO routines:BIO_new_file:no such file:crypto/bio/bss_file.c:81:
Check that the request matches the signature
Signature ok
Certificate Details:
        Serial Number: 4096 (0x1000)
        Validity
            Not Before: Feb 20 17:35:09 2018 GMT
            Not After : Feb 18 17:35:09 2028 GMT
        Subject:
            countryName               = PL
            stateOrProvinceName       = lodzkie
            organizationName          = r4pt0r Test Systems
            commonName                = r4pt0r Intermediate CA
            emailAddress              = admin@example.com
        X509v3 extensions:
            X509v3 Subject Key Identifier:
                3D:AC:8E:21:79:5A:AD:7B:7C:92:92:65:B7:19:D0:E8:00:0E:50:70
            X509v3 Authority Key Identifier:
                keyid:29:53:8A:D2:ED:CF:35:C2:BB:A8:12:06:01:74:99:A3:B8:E5:DC:FE

            X509v3 Basic Constraints: critical
                CA:TRUE, pathlen:0
            X509v3 Key Usage: critical
                Digital Signature, Certificate Sign, CRL Sign
Certificate is to be certified until Feb 18 17:35:09 2028 GMT (3650 days)
Sign the certificate? [y/n]:y


1 out of 1 certificate requests certified, commit? [y/n]y
Write out database with 1 new entries
Data Base Updated
$ openssl x509 -noout -text -in intermediate/certs/intermediate.cert.pem
Certificate:
    Data:
        Version: 3 (0x2)
        Serial Number: 4096 (0x1000)
    Signature Algorithm: sha256WithRSAEncryption
        Issuer: C = PL, ST = lodzkie, O = r4pt0r Test Systems, CN = r4pt0r Root CA, emailAddress = admin@example.com
        Validity
            Not Before: Feb 20 17:35:09 2018 GMT
            Not After : Feb 18 17:35:09 2028 GMT
        Subject: C = PL, ST = lodzkie, O = r4pt0r Test Systems, CN = r4pt0r Intermediate CA, emailAddress = admin@example.com
        Subject Public Key Info:
            Public Key Algorithm: rsaEncryption
                Public-Key: (8192 bit)
                Modulus:
                    00:d4:c9:03:36:4a:dd:3d:ee:ca:bd:c1:d8:fe:51:
<quite a lot of data>
                    5a:ca:74:74:c8:a2:b2:69:0a:0c:c7:f9:d6:8a:58:
                    41:45:73:fc:2b
                Exponent: 65537 (0x10001)
        X509v3 extensions:
            X509v3 Subject Key Identifier:
                3D:AC:8E:21:79:5A:AD:7B:7C:92:92:65:B7:19:D0:E8:00:0E:50:70
            X509v3 Authority Key Identifier:
                keyid:29:53:8A:D2:ED:CF:35:C2:BB:A8:12:06:01:74:99:A3:B8:E5:DC:FE

            X509v3 Basic Constraints: critical
                CA:TRUE, pathlen:0
            X509v3 Key Usage: critical
                Digital Signature, Certificate Sign, CRL Sign
    Signature Algorithm: sha256WithRSAEncryption
         15:04:2f:85:89:f6:77:82:c4:60:78:f0:4f:ac:39:ad:15:14:
<quite a lot of data>
         7c:71:95:db:16:02:de:01:70:fe:8f:48:94:92:11:1b
$ openssl verify -CAfile certs/ca.cert.pem intermediate/certs/intermediate.cert.pem
intermediate/certs/intermediate.cert.pem: OK
$ cat intermediate/certs/intermediate.cert.pem certs/ca.cert.pem > intermediate/certs/ca-chain.cert.pem
$ chmod 444 intermediate/certs/ca-chain.cert.pem

Server certificate

In the following parts, wherever [domain] appears, it should be changed to hostname of our hidden service.

At first, we need to generate certificate request (CSR) on our server:

$ openssl genrsa -out [domain].onion.key.pem 4096
Generating RSA private key, 4096 bit long modulus
.................++
..............................................................................++
e is 65537 (0x010001)
$ chmod 400 [domain].onion.key.pem
$ openssl req -config ca/intermediate/openssl.cnf \
> -key [domain].onion.key.pem -new -sha256 -out [domain].onion.csr.pem
You are about to be asked to enter information that will be incorporated
into your certificate request.
What you are about to enter is what is called a Distinguished Name or a DN.
There are quite a few fields but you can leave some blank
For some fields there will be a default value,
If you enter '.', the field will be left blank.
-----
Country Name (2 letter code) [GB]:PL
State or Province Name [England]:lodzkie
Locality Name []:
Organization Name [Alice Ltd]:r4pt0r Test Systems
Organizational Unit Name []:
Common Name []:[domain].onion
Email Address []:admin@[domain].onion

Then, we will sign the request with intermediate CA private key, thus issuing the certificate. But first of all, we need to receive the CSR from the server, to intermediate/csr/ directory.

$ openssl ca -config intermediate/openssl.cnf -extensions server_cert -days 375 \
> -notext -md sha256 -in intermediate/csr/[domain].onion.csr.pem -out intermediate/certs/[domain].onion.cert.pem
Using configuration from intermediate/openssl.cnf
Enter pass phrase for ca/intermediate/private/intermediate.key.pem:
Can't open ca/intermediate/index.txt.attr for reading, No such file or directory
139810167087040:error:02001002:system library:fopen:No such file or directory:crypto/bio/bss_file.c:74:fopen('ca/intermediate/index.txt.attr','r')
139810167087040:error:2006D080:BIO routines:BIO_new_file:no such file:crypto/bio/bss_file.c:81:
Check that the request matches the signature
Signature ok
Certificate Details:
        Serial Number: 4096 (0x1000)
        Validity
            Not Before: Feb 20 17:52:13 2018 GMT
            Not After : Mar  2 17:52:13 2019 GMT
        Subject:
            countryName               = PL
            stateOrProvinceName       = lodzkie
            organizationName          = r4pt0r Test Systems
            commonName                = [domain].onion
            emailAddress              = admin@[domain].onion
        X509v3 extensions:
            X509v3 Basic Constraints:
                CA:FALSE
            Netscape Cert Type:
                SSL Server
            Netscape Comment:
                OpenSSL Generated Server Certificate
            X509v3 Subject Key Identifier:
                DD:6E:E8:78:91:B9:F7:F4:0A:06:3F:D2:38:6D:11:4E:3C:D3:BC:E0
            X509v3 Authority Key Identifier:
                keyid:3D:AC:8E:21:79:5A:AD:7B:7C:92:92:65:B7:19:D0:E8:00:0E:50:70
                DirName:/C=PL/ST=lodzkie/O=r4pt0r Test Systems/CN=r4pt0r Root CA/emailAddress=admin@example.com
                serial:10:00

            X509v3 Key Usage: critical
                Digital Signature, Key Encipherment
            X509v3 Extended Key Usage:
                TLS Web Server Authentication
Certificate is to be certified until Mar  2 17:52:13 2019 GMT (375 days)
Sign the certificate? [y/n]:y


1 out of 1 certificate requests certified, commit? [y/n]y
Write out database with 1 new entries
Data Base Updated
$ openssl x509 -noout -text -in intermediate/certs/[domain].onion.cert.pem
Certificate:
    Data:
        Version: 3 (0x2)
        Serial Number: 4096 (0x1000)
    Signature Algorithm: sha256WithRSAEncryption
        Issuer: C = PL, ST = lodzkie, O = r4pt0r Test Systems, CN = r4pt0r Intermediate CA, emailAddress = admin@example.com
        Validity
            Not Before: Feb 20 17:52:13 2018 GMT
            Not After : Mar  2 17:52:13 2019 GMT
        Subject: C = PL, ST = lodzkie, O = r4pt0r Test Systems, CN = [domain].onion, emailAddress = admin@[domain].onion
        Subject Public Key Info:
            Public Key Algorithm: rsaEncryption
                Public-Key: (4096 bit)
                Modulus:
                    00:c5:d3:e2:a0:97:b8:4d:67:22:94:c9:be:17:e3:
<quite a lof of data>
                    49:76:cf
                Exponent: 65537 (0x10001)
        X509v3 extensions:
            X509v3 Basic Constraints:
                CA:FALSE
            Netscape Cert Type:
                SSL Server
            Netscape Comment:
                OpenSSL Generated Server Certificate
            X509v3 Subject Key Identifier:
                DD:6E:E8:78:91:B9:F7:F4:0A:06:3F:D2:38:6D:11:4E:3C:D3:BC:E0
            X509v3 Authority Key Identifier:
                keyid:3D:AC:8E:21:79:5A:AD:7B:7C:92:92:65:B7:19:D0:E8:00:0E:50:70
                DirName:/C=PL/ST=lodzkie/O=r4pt0r Test Systems/CN=r4pt0r Root CA/emailAddress=admin@example.com
                serial:10:00

            X509v3 Key Usage: critical
                Digital Signature, Key Encipherment
            X509v3 Extended Key Usage:
                TLS Web Server Authentication
    Signature Algorithm: sha256WithRSAEncryption
         b0:92:d9:d5:3b:31:38:f6:b8:51:1f:41:e9:f7:d8:e6:33:67:
<quite a lot of data>
         ee:c4:eb:19:86:69:00:26:8d:04:7b:97:0b:8f:f5:76
$ openssl verify -CAfile intermediate/certs/ca-chain.cert.pem intermediate/certs/[domain].onion.cert.pem
intermediate/certs/[domain].onion.cert.pem: OK

httpd configuration

Finally, we can use generated files to set up HTTPS encryption on webserver. For this, I am using httpd as it is the most common webserver in use. We need following files:

  1. [domain].onion.key.pem – this is private key, that will be used to set up TLS session
  2. [domain].onion.cert.pem – this is certificate that will prove our identity, so web browser will not display any warnings as long as we will have CA certificate installed
  3. ca-chain.cert.pem – this is chain of certificates we created together with intermediate CA, that consists of both CAs – root and intermediate

Below is httpd configuration file, after enabling TLS:

Listen 666

<VirtualHost *:666>
    ServerAdmin admin@re-ws.pl
    DocumentRoot "/home/r4pt0r/tor/hs/public_html"
    ServerName 192.168.253.4
    ErrorLog "[path]/tor/hs/error_log"
    CustomLog "[path]/tor/hs/access_log" common
    ScriptAlias /cgit/ "/usr/lib/cgit/cgit.cgi/"
    Alias /cgit-css "/usr/share/webapps/cgit/"
    SSLEngine on
    SSLCertificateFile "[path]/tor/hs/tls/[domain].onion.cert.pem"
    SSLCertificateKeyFile "[path]/tor/hs/tls/[domain].onion.key.pem"
    SSLCACertificateFile "[path]/tor/hs/tls/ca-chain.cert.pem"
</VirtualHost>

As can be seen above, all necessary files had been moved to tls directory of our hidden service main directory.

Afterwards, one slight change is needed in torrc file:

HiddenServicePort 443 127.0.0.1:666

From now on, we need to use https://[domain].onion to visit our site, as it is now TLS-encrypted and using port 443, which is default for HTTPS. For convenience, we can set up another httpd vhost on different port, that will redirect all HTTP traffic through HTTPS and link it to port 80, so remembering about https in address will not be necessary. But, it is only optional, so I will leave it as an exercise to the reader.

Firefox

From this point it is useful to have Firefox that is not constantly reminding about insecure connection. To prevent this, we should install CA certificate into Firefox. One remark here: as we are going to hack Firefox to trust our certificate, now our whole browsing through that instance of Firefox relies on our CAs private key. So, it is best to not use the same instance for anything else unless you are really sure, the private keys for both root and intermediate are perfectly secure.

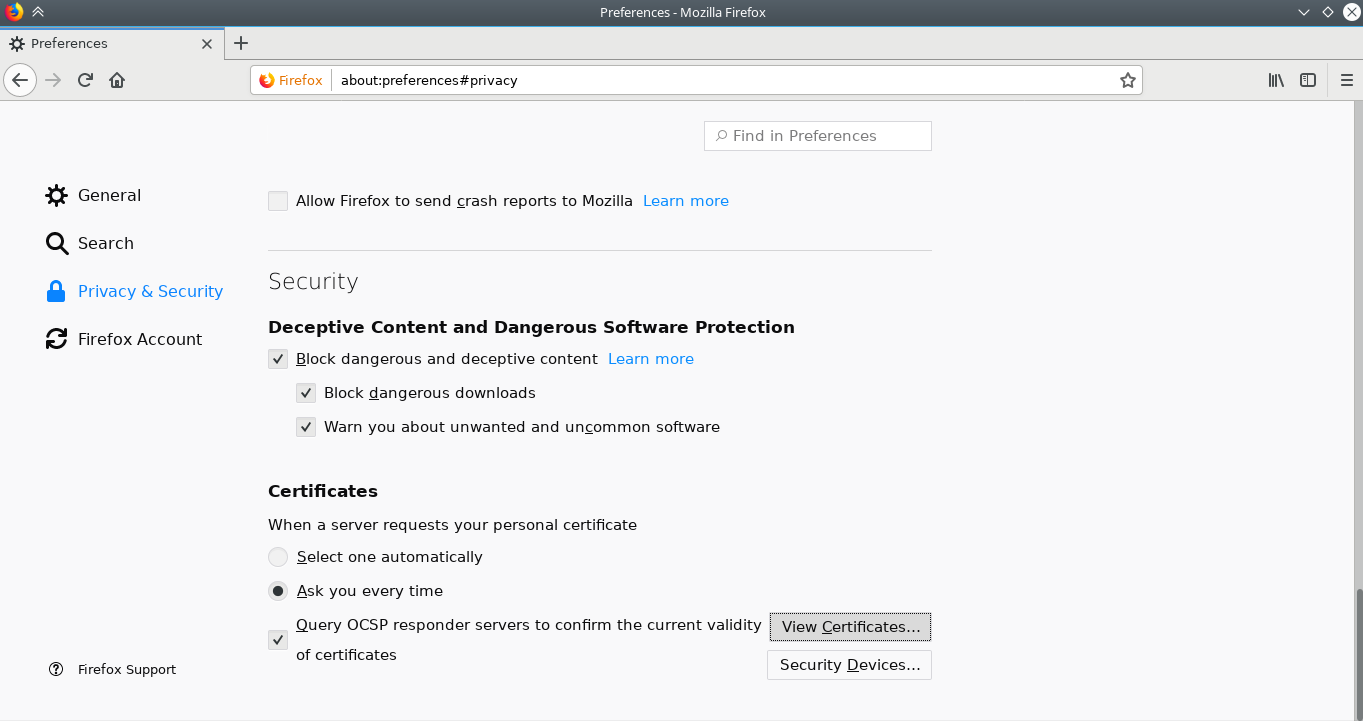
To install the certificate, follow the screenshots below:

Firefox privacy preferences
On preferences page, got to security and scroll all the way down to View Certificates button

Firefox CM - Authorities

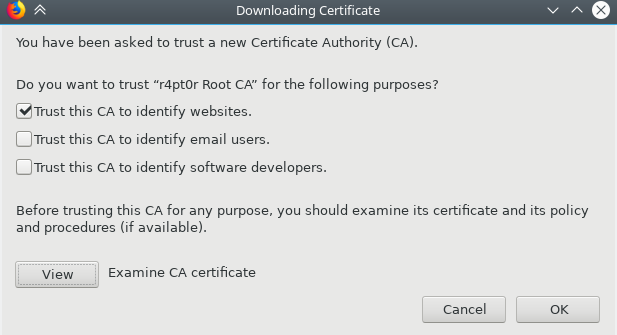
Firefox - Downloading Certificate
Confirm that this certificate will be able to identify websites
Firefox - page secure
Finally, we are secure and no exclamation mark appears!
Posted in Setting up new v3 Hidden Service with ultimate security, TutorialsTagged English, PKI, software, tor, X.509Leave a comment

Setting up new v3 Hidden Service with ultimate security: Part 1: Hidden Service setup

Posted on February 13, 2018 - March 6, 2018 by Kamil (aka. v3l0c1r4pt0r)

This post is a part of Tor v3 tutorial. Other parts are:

  1. Hidden Service setup
  2. PKI and TLS
  3. Client Authentication
  4. Installing client certificates to Firefox for Android

As a student I was lucky to have unlimited private Git repositories on Github, since they introduced that to their first paid plan. Unfortunately, I don’t have access to educational e-mail anymore, so I won’t be able to renew the service. This leads to a need to have that feature migrated to somewhere else. Some time ago, I installed cgit and gitolite on my single board computer (SBC). But, because of Github, there was no need to use that. Now it seems like a good replacement to Github’s Developer plan.

Few weeks ago, there was interesting event – Tor Project introduced new version of their Hidden Services – v3, which changes length of hidden service address in .onion domain and disables “feature” enabling some nodes in the network to index all existing service addresses. This seems like a good moment to give it a try and check, how fast (or rather how slow) will be the solution providing git through Tor on few-year-old SBC. By the way, I will show, how to configure things with maximum security in mind.

Disclaimer: I am not a person with deep knowledge of inner workings of Tor network, so I strongly encourage you to read thing or two, about how to use it safely. This article might contain errors that might reveal your identity, especially when used together with not-self-owned hidden services.

Prerequisites

Let’s start with summary of what we will need to make Tor v3 work:

  • tor in version 0.3.2.9 or higher
  • alternatively Tor Browser 7.5 or higher
  • for Android: Orbot and Orfox (at the moment of writing this, there is no support in current version of Orbot, so custom compilation is required – I am using Termux to provide tor binary)
  • httpd or any other HTTP server, able to provide service with only one vhost on separate TCP port

Because of the way, I am planning to configure hidden service in future, it might be a good idea to set up separate Tor browser at this moment, dedicated to this service, if it is going to be production configuration. If this is just an experiment, this advice could safely be ignored. However it is good to know, how to undo any modifications to the browser that will be done in the next parts.

httpd

What we need to do is to listen on localhost, on some random TCP port. Then we will set up httpd to provide only one virtual host on this custom port. It would be perfect to disable any other vhosts as our hidden service will work also as non-hidden service for local users, so if other service is buggy and allows to connect to other local services (see e.g. DNS rebinding), at least address of our hidden service will be compromised.

I have following configuration:

Listen 666

<VirtualHost *:666>
    ServerAdmin [email]@[domain]
    DocumentRoot "[path]/public_html"
    ServerName [domain].onion
    ErrorLog "[path]/error_log"
    CustomLog "[path]/access_log" common
</VirtualHost>

<Directory "[path]/public_html">
    DirectoryIndex index.html index.php index.txt
    AllowOverride All
    Options FollowSymlinks
    Require all granted
</Directory>

Furthermore, httpd must be able to traverse to public_html directory, so every directory from public_html up to root must have execute privilege for http user and directory itself as well as its content must be available (or better owned) by http.

After that and after starting httpd, it should be possible to visit http://localhost:666 via web browser and see content of public_html directory. If this is true, we can move on to tor configuration.

tor

SocksPort auto

HiddenServiceDir /etc/tor/hsv3
HiddenServiceVersion 3
HiddenServicePort 80 127.0.0.1:666

SafeLogging 0
Log notice stdout
Log notice file /etc/tor/hsv3/hs.log
Log info file /etc/tor/hsv3/hsinfo.log

Now, on the first startup of tor,  it should create keys for our new hidden service. We can look into /etc/tor/hsv3/hostname to see the .onion address. It is good idea to set key files and hostname file as readable as only user running tor service. In case of service started by systemd, this will probably be tor by default.

After starting tor service (systemctl start tor in case of systemd), we can check if everything works properly by visiting our hidden service with tor-enabled browser (using tor 0.3.2.9 or higher). That’s it.

Firefox for Android

At the time of writing this article there is still no upgrade for Orbot app, providing GUI interface for tor. Because of that, it might be required to use ordinary Firefox to use tor as a proxy, which is generally bad idea for connecting to any hidden services, because of privacy and anonymity. Fortunately, we can live with revealing our identity to ourselves 🙂 so we can do it only this single time.

What we need to change are following configuration options, available under about:config page:

  • network.proxy.socks to localhost
  • network.proxy.socks_port to 9050
  • network.proxy.socks_remote_dns to true
  • network.proxy.socks_version to 5, if any other (should be default)
  • network.proxy.type to 1 (0 means no proxy, 5 is system proxy)

Conclusion

Now we are ready to use our hidden service, from both desktop and mobile. Still, we use only HTTP protocol, which is not a big problem, as tor already provides encryption. Neverheless our next goal would be to configure HTTPS. And then we will configure client authentication for ultimate security of our hidden service.

Posted in Setting up new v3 Hidden Service with ultimate security, TutorialsTagged English, Linux, software, torLeave a comment

LKV373A: porting objdump

Posted on December 30, 2017 - October 17, 2019 by Kamil (aka. v3l0c1r4pt0r)

This article is part of series about reverse-engineering LKV373A HDMI extender. Other parts are available at:

  • Part 1: Firmware image format
  • Part 2: Identifying processor architecture
  • Part 3: Reverse engineering instruction set architecture
  • Part 4: Crafting ELF
  • Part 5: Porting objdump
  • Part 6: State of the reverse engineering
  • Part 7: radare2 plugin for easier reverse engineering of OpenRISC 1000 (or1k)

After part number four, we already have ELF file, storing all the data we found in firmware image, described in a way that should make our analysis easier. Moreover, we have ability to define new symbols inside our ELF file. The next step is to add support for our custom architecture into objdump and this is what I want to show in this tutorial.

Finding best architecture to copy

If we want to set up new architecture in objdump code, we need to learn interfaces that need to be implemented. It would be easier if we can use some existing code to do so. After some looking into the binutils’ code I learned that what is of special interest are bfd and opcodes libraries. They contain code dedicated to particular architectures. The first one seem to be related to object file handling (which in our case is ELF), so we should not tinker with it too much. Second one is related to disassembling binary programs, so is what we are looking for.

I did some quick examination of source code related to popular architectures and it seems not to be easy to adjust to our needs. Architecture I found to be best suitable for modification is Microblaze. Its source seem to be quite well-written, clean and short. Also from my research of architecture name for LKV373A (part 2, failed by the way) I also remember it is quite similar to the one present in LKV373A, so it is even better decision to use it.

Compiling objdump for target architecture

At first it is useful to learn how to compile objdump, so it will be able to disassemble program written for our target. Microblaze is not really a mainstream architecture, so there aren’t many programs compiled for it available online after typing 'microblaze program elf' into usual search engine. However, I was able to find 2 of them, so I was able to verify that compilation worked. If you can’t find any, I uploaded these to MEGA, so they can serve as test cases. First one is minimal valid file, the other one is quite huge.

Compilation is very easy. The only thing that needs to be done beside usual ./configure && make && make install is adding target option to configure script. So, the script looks as follows:

./configure --target=microblaze-elf

Of course, install step can safely be skipped as well as compilation of other tools, beside objdump. objdump itself seem to be built using make binutils/objdump. However it can’t be build successfully using that shortcut, so whole binutils package must be configured the way, everything not buildable is excluded from the build.

Setting up own architecture

Next step is to add support for our brand new, custom architecture to binutils’ configuration files and copy microblaze sources, so they will simulate our architecture, until we will write our own implementation. Then it should be possible to test objdump again, against our sample microblaze programs and disassembly should still work.

Even without any modification to binutils’ source or configs, it should be possible to configure it for any random architecture. The only constraint is format of the target string: ARCH-OS-FORMAT, where FORMAT is most likely to be elf. So, if we pass lkv373a-unknown-elf as target, it will work. -unknown part is usually skipped and this will not work. If we need it to work, config.sub must be modified. config.sub is used to convert any string, passed to configure into canonical form, so in our case lkv373a-unknown-elf. If it detects, that it is already in canonical form, it does nothing.

Final configure command will be slightly more complex, as we have to disable some parts, that are not of our interest and requires additional effort to work:

./configure --target=lkv373a-unknown-elf --disable-gas --disable-ld --disable-gdb

Although passing something random as target option works on configure stage, it will obviously fail on make stage. What make is doing at first is configuring all the sublibraries. What is of our interest is bfd and opcodes. And the first one fails. So this is the first problem, we need to get rid of.

bfd/config.bfd

The purpose of this file is to set some environment variables depending on target architecture. If it does not know the architecture, it returns error to caller, which is probably bfd’s configure script, called by make. According to documentation in file header, it sets following variables:

  1. targ_defvec – default vector. This links target to list of objects that will provide support for ELF file built for specific architecture (stored in bfd/configure.ac)
  2. targ_selvecs – list of other selected vectors. Useful e.g. when we need support for both 32- and 64-bit ELFs. Not needed here.
  3. targ64_selvecs – 64-bit related stuff. Used when target can be both 32- and 64-bit, meaningless in our case.
  4. targ_archs – name of the symbol storing bfd_arch_info_type structure. It provides description of architecture to support.
  5. targ_cflags – looks like some hack to add extra CFLAGS to compiler. We don’t care.
  6. targ_underscore – not sure what it is, should have no impact on our goals (possible values are yes or no)

To sum up, what we need to do on this step is to define default vector, we will later add to configure.ac and set name of architecture description structure. The structure itself will be defined later. Finally, I ended up with the following patch:

@@ -173,6 +173,7 @@ hppa*)     targ_archs=bfd_hppa_arch ;;
 i[3-7]86)   targ_archs=bfd_i386_arch ;;
 i370)     targ_archs=bfd_i370_arch ;;
 ia16)     targ_archs=bfd_i386_arch ;;
+lkv373a)  targ_archs=bfd_lkv373a_arch ;;
 lm32)           targ_archs=bfd_lm32_arch ;;
 m6811*|m68hc11*) targ_archs="bfd_m68hc11_arch bfd_m68hc12_arch bfd_m9s12x_arch bfd_m9s12xg_arch" ;;
 m6812*|m68hc12*) targ_archs="bfd_m68hc12_arch bfd_m68hc11_arch bfd_m9s12x_arch bfd_m9s12xg_arch" ;;
@@ -924,6 +925,10 @@ case "${targ}" in
     targ_defvec=iq2000_elf32_vec
     ;;

+  lkv373a*-*)
+    targ_defvec=lkv373a_elf32_vec
+    ;;
+
   lm32-*-elf | lm32-*-rtems*)
     targ_defvec=lm32_elf32_vec
     targ_selvecs=lm32_elf32_fdpic_vec

bfd/configure.ac

Now we need to define vector, we just declared to use for lkv373a architecture.

505     k1om_elf64_fbsd_vec)         tb="$tb elf64-x86-64.lo elfxx-x86.lo elf-ifunc.lo elf-nacl.lo elf64.lo $elf"; target_size=64 ;;
506     lkv373a_elf32_vec)           tb="$tb elf32-lkv373a.lo elf32.lo $elf" ;;
507     l1om_elf64_vec)              tb="$tb elf64-x86-64.lo elfxx-x86.lo elf-ifunc.lo elf-nacl.lo elf64.lo $elf"; target_size=64 ;;

Unfortunately, as we did modifications to .ac script, we now need to rebuild our configure. From my experience, any tinkering with autohell, after solving one problem, creates 5 more. We need to get into bfd directory and reconfigure project:

cd bfd
autoreconf

Now, if it worked for you, you should definitely go, play some lottery 🙂 . For me it said that I need exactly same version of autoconf as used by binutils’ developers. Because autoconf is so great, probably what I will show now is completely useless for anyone, but hacks I needed to do are at first to add:

20 m4_define([_GCC_AUTOCONF_VERSION], [2.69])

to the beginning of configure.ac file. Then bfd/doc/Makefile.am contains removed cygnus option at the beginning, in AUTOMAKE_OPTIONS, so we need to remove it. After that doing automake --add-missing, as autoreconf suggests, and then again autoreconf should solve the problem. But, as I said, this will probably not work for you. I can only wish you good luck.

(if were following the steps, you might have noticed that autoconf complained about not being in version 2.64 and we overridden version from 2.69 to 2.69 and it worked 🙂 , don’t ask me, why, please!)

After this step, compilation should start (and obviously will fail miserably on bfd as it misses few symbols). Now its time to make bfd compilable.

bfd/elf32-lkv373a.c

This file is meant to provide support for custom features of ELF file. As we don’t have any, we can safely do nothing here. Good template of such file is elf32-m88k.c as it does exactly this.

One thing that seem to be important here is EM value of architecture described. EM is an enum used in ELF file to define target architecture, so it might be required to adjust in our new elf32-lkv373a.c file. By the way definition of this value have to be added to include/elf/common.h:

433 /* LKV373A architecture */
434 #define EM_LKV373A              0x373a

It might also be a good idea to add it to elfcpp/elfcpp.h. To make the file compile, it is necessary to add following to bfd/bfd-in2.h as value of bfd_architecture enum:

2398   bfd_arch_lkv373a,    /* LKV373A */

bfd/archures.c

As we declared bfd_lkv373a_arch as symbol with CPU description structure, we now need to add this declaration to archures.c, as this is the file, where it will be used. We have to add:

611 extern const bfd_arch_info_type bfd_l1om_arch;
612 extern const bfd_arch_info_type bfd_lkv373a_arch;
613 extern const bfd_arch_info_type bfd_lm32_arch;

bfd/targets.c

Similar situation is in targets.c file. Here we have to provide declaration of our vector as bfd_target. This will be another structure, which seem to be generated automatically, so we should not care about it.

704 extern const bfd_target l1om_elf64_fbsd_vec;
705 extern const bfd_target lkv373a_elf32_vec;
706 extern const bfd_target lm32_elf32_vec;

bfd/cpu-lkv373a.c

This last file, we need in bfd, provides bfd_arch_info_type structure and… that’s it! Can be easily borrowed from cpu-microblaze.c with only slight modifications. One thing that needs explanation here is section_align_power. As far as I understand it, it is power of two to which the beginning of the section in memory must be aligned. It should be safe to put 0 here, as we are not going to load our ELF into memory.

This should close the bfd part of initialization. As you can see, there was no development at all to be done here. Let’s now go to opcodes library.

opcodes/configure.ac

At first we need to define objects to build for LKV373A architecture in opcodes library. This is quite similar to what we had to do in configure.ac of bfd library.

282         bfd_iq2000_arch)        ta="$ta iq2000-asm.lo iq2000-desc.lo iq2000-dis.lo iq2000-ibld.lo iq2000-opc.lo" using_cgen=yes ;;
283         bfd_lkv373a_arch)       ta="$ta lkv373a-dis.lo" ;;
284         bfd_lm32_arch)          ta="$ta lm32-asm.lo lm32-desc.lo lm32-dis.lo lm32-ibld.lo lm32-opc.lo lm32-opinst.lo" using_cgen=yes ;;

Hopefully, -dis file will be enough to be implemented. I’ve made a copy from microblaze configuration. The same way we will copy whole source file and any related headers in the next step.

Now, similarly to bfd’s configure.ac, we have to reconfigure it. And again, nobody knows what errors we will encounter.

opcodes/disassemble.c

The only thing that have to be done here is to set pointer of disassemble function. For this following snippets should be added:

53 #define ARCH_lkv373a
255 #ifdef ARCH_lkv373a
256     case bfd_arch_lkv373a:
257       disassemble = print_insn_lkv373a;
258       break;
259 #endif

And to disassemble.h:

62 extern int print_insn_lkv373a           (bfd_vma, disassemble_info *);

opcodes/lkv373a-dis.c

This is, where real stuff will happen. As our goal, for now, is not to make implementation of LKV373A architecture, but rather set everything up, so objdump will build, we can copy source file from microblaze-dis.c. It is also required to copy headers, related to MicroBlaze, used by this file, so:

  • opcodes/microblaze-dis.h
  • opcodes/microblaze-opc.h
  • opcodes/microblaze-opcm.h

And change include directives in them to link to lkv373a file, rather than microblaze ones.

Now, optionally we could change names of any symbols referring to name microblaze, but this should not be required, as original microblaze files should not be included in the build. The only change than need to be done is print_insn_microblaze into print_insn_lkv373a, as this is what we added to disassemble.c.

You should now be able to compile working objdump with LKV373A support (of course with wrong implementation, for now). We can now verify that everything works on slightly modified ELF file for MicroBlaze architecture (EM field must point to LKV373A – value must be 0x373a). Well done!

NOTE: all the steps, done till now are available on tutorial-setup tag in repository on Github.

Functions to implement

Now, finally the real fun starts. Bindings between opcodes library and objdump itself, require at least print_insn_lkv373a to be implemented.

What should happen inside this function is quite simple and can be described in following steps:

  1. Gets bfd_vma and struct disassemble_info (called info below) as parameters
  2. Read raw data containing instructions using info->read_memory_func
  3. Call info->memory_error_func in case of any errors
  4. Use info->fprintf_func to print disassembled instruction into info->stream
  5. Optionally use info->symbol_at_address_func to determine if there is any symbol declared at address decoded from instructions
  6. If symbol exists, call info->print_address_func
  7. Return number of bytes consumed

Following is some documentation, I wrote for easier implementation (mostly translated inline comments), of functions to be called:

  /**
   * \brief Function used to get bytes to disassemble
   *
   * \param memaddr Address of the current instruction
   * \param myaddr Buffer, where the bytes will be stored
   * \param length Number of bytes to read
   * \param dinfo Pointer to info structure
   *
   * \return errno value or 0 for success
   */
  int (*read_memory_func)
    (bfd_vma memaddr, bfd_byte *myaddr, unsigned int length,
     struct disassemble_info *dinfo);
  /**
   * \brief Call if unrecoverable error occurred
   *
   * \param status errno from read_memory_func
   * \param memaddr Address of current instruction
   * \param dinfo Pointer to info structure
   */
  void (*memory_error_func)
    (int status, bfd_vma memaddr, struct disassemble_info *dinfo);
  /**
   * \brief Pointer to fprintf
   *
   * \param stream Pass info->stream here
   * \param char Format string
   * \param ... vargs
   *
   * \return Number of characters printed
   */
  typedef int (*fprintf_ftype) (void *, const char*, ...) ATTRIBUTE_FPTR_PRINTF_2;
  /**
   * \brief Determines if there is a symbol at the given ADDR
   *
   * \param addr Address to check
   * \param dinfo Pointer to info structure
   *
   * \return If there is returns 1, otherwise returns 0
   * \retval 1 If there is any symbol at ADDR
   * \retval 0 If there is no symbol at ADDR
   */
  int (* symbol_at_address_func)
    (bfd_vma addr, struct disassemble_info *dinfo);
  /**
   * \brief Print symbol name at ADDR
   *
   * \param addr Address at which symbol exists
   * \param dinfo Pointer to info structure
   */
  /* Function called to print ADDR.  */
  void (*print_address_func)
    (bfd_vma addr, struct disassemble_info *dinfo);

For easier start of development, this commit can be used as template. You can find effects of implementation according to this description on lkv373a branch of my binutils fork on Github. After this step, you should have working objdump, able to disassemble architecture of your choice.

Alternative way

According to binutils’ documentation, porting to new architectures should be done using different approach. Instead of copying sources from other architectures, developers should write CPU description files (cpu/ directory) and then use CGEN to generate all necessary files. However, I found these files way too complicated comparing to goal, I wanted to achieve, therefore I used the shortcut. In reality, however, this might be a better way, as the final result should be the support for new architecture not only in objdump, but also in e.g. GAS (GNU assembler). If you want to go that way, another useful resource might be description of CPU description language.

Plans for the future

As I am now able to speed up reverse engineering of both instruction set and LKV373A firmware, I am planning to create public repository of my progress and guess operations done by some more opcodes as I already know only few of them. So, I will probably push some more commits to binutils repo as well. I hope this will enable me to gain some more knowledge about LKV373A and allow, me or someone else, to reverse engineer second part of the firmware, which seem to be way more interesting that the one, I was reverse engineering till now.

Posted in Reversing LKV373A, TutorialsTagged English, hacking, hardware, Linux, programming, Reverse Engineering, softwareLeave a comment

Posts navigation

Newer posts

Tags

Android assembly busybox C CAN can-hacking cc-factory cmake compiler docker Dreamspark electronics English gcc hacking hardware JavaCard JCOP kernel KiCAD library Linux PC PCB pinout PKI polski programming Python radio Raspberry Pi Reverse Engineering RTL-SDR SDC SDM SDR smart card software tor tty UART UEFi Windows X.509 Xperia Pro

Recent Posts

  • PHP build for use bundled in Android applications
  • Running graphical apps inside Docker containers
  • Plugin architecture demo for Python projects
  • Authorizing adb connections from Android command line (and making other service calls from cli)
  • How to recover torrent from rtorrent meta files

Recent Comments

  • pomi on Playing with GF-07 GPS device
  • pomi on Playing with GF-07 GPS device
  • Hamdy Abumgata on Playing with GF-07 GPS device
  • Mousum Gogoi on Playing with GF-07 GPS device
  • Eason on Sniffing USB traffic with DSLogic logic analyzer into pcap file

Categories

  • News
  • Random
  • Reversing LKV373A
  • Setting up new v3 Hidden Service with ultimate security
  • Tutorials
  • Uncategorized
  • Understanding JCOP

Links

  • Me @ github
  • LKV373A Wiki
  • DevTomek

Archives

  • December 2024
  • November 2024
  • May 2024
  • July 2023
  • October 2022
  • August 2022
  • July 2021
  • June 2021
  • May 2021
  • December 2020
  • November 2020
  • October 2020
  • August 2020
  • December 2019
  • November 2019
  • October 2019
  • August 2019
  • July 2019
  • February 2019
  • November 2018
  • October 2018
  • June 2018
  • May 2018
  • March 2018
  • February 2018
  • January 2018
  • December 2017
  • November 2017
  • September 2017

Meta

  • Log in
  • Entries feed
  • Comments feed
  • WordPress.org
Proudly powered by WordPress | Theme: micro, developed by DevriX.