As we now have working Public Key Infrastructure, we are ready to use it for more than encrypting traffic (which is already encrypted by Tor). We can very easily turn on client verification on our server. This will prevent anybody not having valid certificate issued by us from visiting our hidden webpage – just in case hiding domain name in hidden services version 3 leaks the name somehow (which should not happen anymore in v3). In this part we will issue client certificate (the procedure is almost identical to server certificate), then configure httpd to require client identification and finally configure Firefox to try sending the certificate. Let’s go!
Issuing user certificate
In my case tmp directory emulated client machine and ca is my Cerificate Authority, which issues certificates. We start by creating request on client side, then sign it on CA side.
$mkdir tmp$cd tmp$openssl genrsa -out v3l0c1r4pt0r@gmail.com.key.pem 4096
Generating RSA private key, 4096 bit long modulus
........++
..............................................++
e is 65537 (0x010001)
$openssl req -config ../ca/intermediate/openssl.cnf -key v3l0c1r4pt0r@gmail.com.key.pem -new -sha256 -out v3l0c1r4pt0r@gmail.com.csr.pem
You are about to be asked to enter information that will be incorporated
into your certificate request.
What you are about to enter is what is called a Distinguished Name or a DN.
There are quite a few fields but you can leave some blank
For some fields there will be a default value,
If you enter '.', the field will be left blank.
-----
Country Name (2 letter code) [GB]:PL
State or Province Name [England]:lodzkie
Locality Name []:
Organization Name [Alice Ltd]:r4pt0r Test Systems
Organizational Unit Name []:
Common Name []:v3l0c1r4pt0r@gmail.com
Email Address []:v3l0c1r4pt0r@gmail.com$chmod 400 v3l0c1r4pt0r@gmail.com.*.pem$cp v3l0c1r4pt0r@gmail.com.csr.pem ../ca/intermediate/csr/$cd ../ca$openssl ca -config intermediate/openssl.cnf -extensions usr_cert -days 375 \>-notext -md sha256 -in intermediate/csr/v3l0c1r4pt0r@gmail.com.csr.pem \>-out intermediate/certs/v3l0c1r4pt0r@gmail.com.cert.pem
Using configuration from intermediate/openssl.cnf
Enter pass phrase for /home/r4pt0r/Research/cubie/newtor/ca/intermediate/private/intermediate.key.pem:
Check that the request matches the signature
Signature ok
Certificate Details:
Serial Number: 4097 (0x1001)
Validity
Not Before: Feb 27 17:14:40 2018 GMT
Not After : Mar 9 17:14:40 2019 GMT
Subject:
countryName = PL
stateOrProvinceName = lodzkie
organizationName = r4pt0r Test Systems
commonName = v3l0c1r4pt0r@gmail.com
emailAddress = v3l0c1r4pt0r@gmail.com
X509v3 extensions:
X509v3 Basic Constraints:
CA:FALSE
Netscape Cert Type:
SSL Client, S/MIME
Netscape Comment:
OpenSSL Generated Client Certificate
X509v3 Subject Key Identifier:
ED:24:E6:FF:1D:9B:61:AC:29:66:39:59:FB:5D:77:25:F7:A3:55:47
X509v3 Authority Key Identifier:
keyid:3D:AC:8E:21:79:5A:AD:7B:7C:92:92:65:B7:19:D0:E8:00:0E:50:70
X509v3 Key Usage: critical
Digital Signature, Non Repudiation, Key Encipherment
X509v3 Extended Key Usage:
TLS Web Client Authentication, E-mail Protection
Certificate is to be certified until Mar 9 17:14:40 2019 GMT (375 days)
Sign the certificate? [y/n]:y
1 out of 1 certificate requests certified, commit? [y/n]y
Write out database with 1 new entries
Data Base Updated
$cd ../tmp$cp ../ca/intermediate/certs/v3l0c1r4pt0r@gmail.com.cert.pem ./$openssl pkcs12 -export -inkey v3l0c1r4pt0r@gmail.com.key.pem -in v3l0c1r4pt0r@gmail.com.cert.pem -out v3l0c1r4pt0r@gmail.com.p12
Enter Export Password:
Verifying - Enter Export Password:
Last step was packaging certificate and key into PKCS#12 container. That is for securing key (we can encrypt it with password), and is a form required by Firefox. After creation of .p12 (and verifying it is fine), we can (and SHOULD) delete source files, as they are not protected in any way.
Configuring httpd to require user certificate
To enforce client verification, following lines must be added to virtual host configuration, in our case it might go just after SSL certificate file paths.
SSLVerifyClientrequireSSLVerifyDepth 2
We have to reload httpd for changes to take effect.
Installing certificate to Firefox
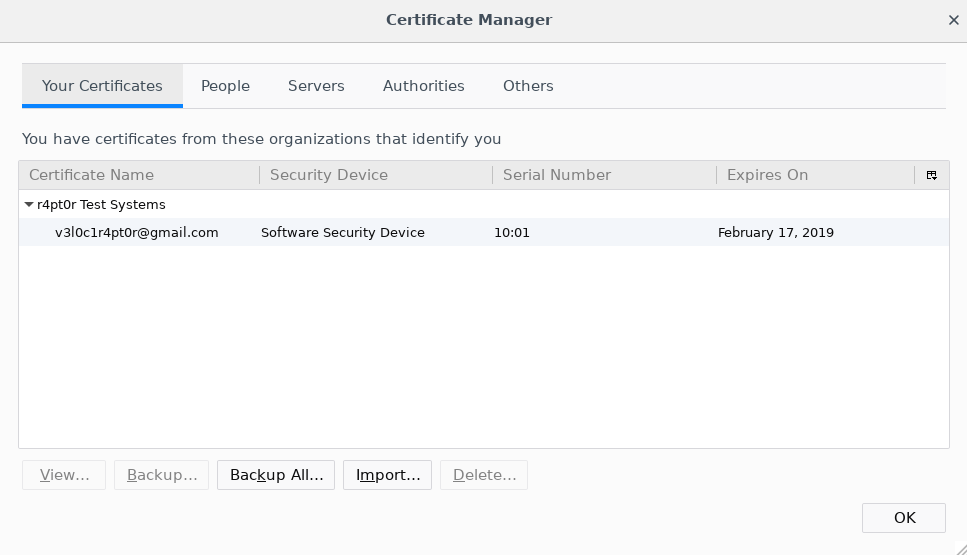
At last, to start using newly generated certificate, we should install it to Firefox. The procedure is similar to the one with CA certificate. We need to open Certificate Manager window. Then, instead of going to Authorities, we go to Your Certificates. Then we click on Import and select .p12 file.
Certificate Manager / Your Certificates
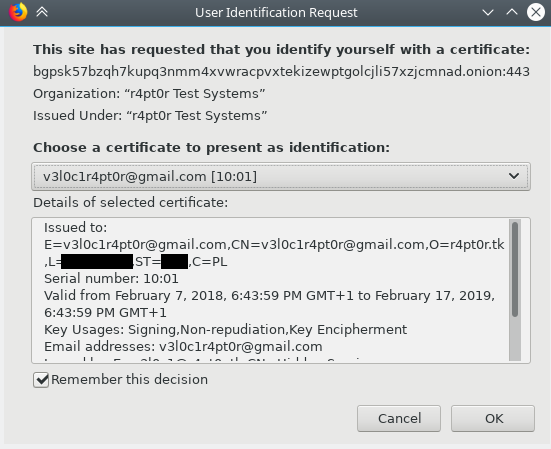
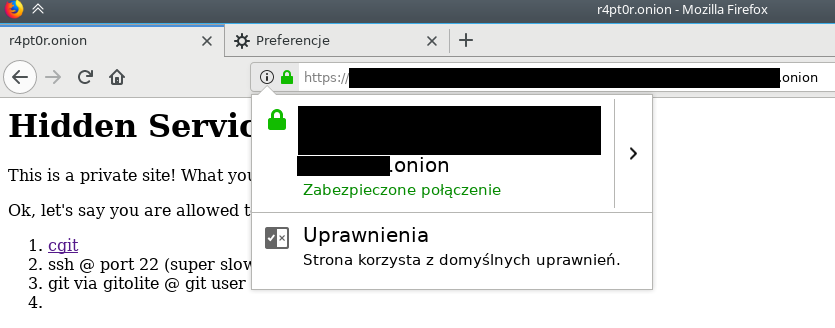
If the file has password, Firefox will ask for it and after successfully reading the content. If everything went well, you should see your certificate on the list. Now we can try connecting to our hidden service. We should see the window like this:
Server asks for client’s identity
Finally, after confirmation, you should see your hidden service content. Congrats!
After setting up working Tor hidden service, the next step to ultimate security is having properly implemented Public Key Infrastructure (PKI). For this step, there are a lot of tutorials already existing and there is not much that needs to be added to them. Personally, I was using tutorial available here for the second time now and I find it very well-written. Because I am going to follow this tutorial, I will just post commands that have to be executed.
Before starting, I have to add one important remark. To make our PKI really secure one, it is crucial to have root CA air-gapped, that is device, on which it will be generated should be disconnected permanently from the internet. Good candidate for such a device might be some old laptop or Raspberry Pi Zero, as it lacks Ethernet port and anything reasonable to connect to internet. It is also important to store generated certificate in a safe place and secure it with strong non-dictionary password, which will be saved only in our mind.
If the requirements are fulfilled, we can start the setup. Below are commands to type as well as output from them, for easier determination of whether the commands were successful or not.
Preparations
At first, we need to create following directory structure:
Then, we need to save this file into root/openssl.cnf and this file into root/intermediate/openssl.cnf. Inside them, the only thing that have to be changed is dir property in CA_default section. Use absolute path to your directory.
Root CA
Note: when giving values for certain fields, better give some country, state (I have just checked it’s necessary), ON, most importantly, Common Name and e-mail. Just in case some program will check if they exists.
$openssl genrsa -aes256 -out private/ca.key.pem 8192
Generating RSA private key, 8192 bit long modulus
.................++
....++
e is 65537 (0x010001)
Enter pass phrase for private/ca.key.pem:
Verifying - Enter pass phrase for private/ca.key.pem:
$chmod 400 private/ca.key.pem$openssl req -config openssl.cnf -key private/ca.key.pem -new -x509 -days 7300 \>-sha256 -extensions v3_ca -out certs/ca.cert.pem
Enter pass phrase for private/ca.key.pem:
You are about to be asked to enter information that will be incorporated
into your certificate request.
What you are about to enter is what is called a Distinguished Name or a DN.
There are quite a few fields but you can leave some blank
For some fields there will be a default value,
If you enter '.', the field will be left blank.
-----
Country Name (2 letter code) [GB]:PL
State or Province Name [England]:lodzkie
Locality Name []:
Organization Name [Alice Ltd]:r4pt0r Test Systems
Organizational Unit Name []:
Common Name []:r4pt0r Root CA
Email Address []:admin@example.com$chmod 444 certs/ca.cert.pem$openssl x509 -noout -text -in certs/ca.cert.pem
Certificate:
Data:
Version: 3 (0x2)
Serial Number:
9a:16:72:e8:ac:81:cd:be
Signature Algorithm: sha256WithRSAEncryption
Issuer: C = PL, ST = lodzkie, O = r4pt0r Test Systems, CN = r4pt0r Root CA, emailAddress = admin@example.com
Validity
Not Before: Feb 20 17:22:27 2018 GMT
Not After : Feb 15 17:22:27 2038 GMT
Subject: C = PL, ST = lodzkie, O = r4pt0r Test Systems, CN = r4pt0r Root CA, emailAddress = admin@example.com
Subject Public Key Info:
Public Key Algorithm: rsaEncryption
Public-Key: (8192 bit)
Modulus:
00:dd:8c:8f:5d:be:f4:0f:63:91:9c:73:bf:a8:17:
<quite a lot of data>
6d:c1:3f:5c:05
Exponent: 65537 (0x10001)
X509v3 extensions:
X509v3 Subject Key Identifier:
29:53:8A:D2:ED:CF:35:C2:BB:A8:12:06:01:74:99:A3:B8:E5:DC:FE
X509v3 Authority Key Identifier:
keyid:29:53:8A:D2:ED:CF:35:C2:BB:A8:12:06:01:74:99:A3:B8:E5:DC:FE
X509v3 Basic Constraints: critical
CA:TRUE
X509v3 Key Usage: critical
Digital Signature, Certificate Sign, CRL Sign
Signature Algorithm: sha256WithRSAEncryption
a9:6d:9e:d4:bf:1b:55:d8:f0:b5:e9:9d:56:e8:58:04:d6:c3:
<quite a lot of data>
89:50:26:4f:3e:93:95:06:c7:38:08:c7:16:0e:d2:a2
Intermediate CA
$openssl genrsa -aes256 -out intermediate/private/intermediate.key.pem 8192
Generating RSA private key, 8192 bit long modulus
.++
........................................................................................................................................................................................................................................................................................++
e is 65537 (0x010001)
Enter pass phrase for intermediate/private/intermediate.key.pem:
Verifying - Enter pass phrase for intermediate/private/intermediate.key.pem:
$chmod 400 intermediate/private/intermediate.key.pem$openssl req -config intermediate/openssl.cnf -new -sha256 \>-key intermediate/private/intermediate.key.pem -out intermediate/csr/intermediate.csr.pem
Enter pass phrase for intermediate/private/intermediate.key.pem:
You are about to be asked to enter information that will be incorporated
into your certificate request.
What you are about to enter is what is called a Distinguished Name or a DN.
There are quite a few fields but you can leave some blank
For some fields there will be a default value,
If you enter '.', the field will be left blank.
-----
Country Name (2 letter code) [GB]:PL
State or Province Name [England]:lodzkie
Locality Name []:
Organization Name [Alice Ltd]:r4pt0r Test Systems
Organizational Unit Name []:
Common Name []:r4pt0r Intermediate CA
Email Address []:admin@example.com$openssl ca -config openssl.cnf -extensions v3_intermediate_ca -days 3650 \>-notext -md sha256 -in intermediate/csr/intermediate.csr.pem -out intermediate/certs/intermediate.cert.pem
Using configuration from openssl.cnf
Enter pass phrase for ca/private/ca.key.pem:
Can't open ca/index.txt.attr for reading, No such file or directory
140341269315520:error:02001002:system library:fopen:No such file or directory:crypto/bio/bss_file.c:74:fopen('ca/index.txt.attr','r')
140341269315520:error:2006D080:BIO routines:BIO_new_file:no such file:crypto/bio/bss_file.c:81:
Check that the request matches the signature
Signature ok
Certificate Details:
Serial Number: 4096 (0x1000)
Validity
Not Before: Feb 20 17:35:09 2018 GMT
Not After : Feb 18 17:35:09 2028 GMT
Subject:
countryName = PL
stateOrProvinceName = lodzkie
organizationName = r4pt0r Test Systems
commonName = r4pt0r Intermediate CA
emailAddress = admin@example.com
X509v3 extensions:
X509v3 Subject Key Identifier:
3D:AC:8E:21:79:5A:AD:7B:7C:92:92:65:B7:19:D0:E8:00:0E:50:70
X509v3 Authority Key Identifier:
keyid:29:53:8A:D2:ED:CF:35:C2:BB:A8:12:06:01:74:99:A3:B8:E5:DC:FE
X509v3 Basic Constraints: critical
CA:TRUE, pathlen:0
X509v3 Key Usage: critical
Digital Signature, Certificate Sign, CRL Sign
Certificate is to be certified until Feb 18 17:35:09 2028 GMT (3650 days)
Sign the certificate? [y/n]:y
1 out of 1 certificate requests certified, commit? [y/n]y
Write out database with 1 new entries
Data Base Updated
$openssl x509 -noout -text -in intermediate/certs/intermediate.cert.pem
Certificate:
Data:
Version: 3 (0x2)
Serial Number: 4096 (0x1000)
Signature Algorithm: sha256WithRSAEncryption
Issuer: C = PL, ST = lodzkie, O = r4pt0r Test Systems, CN = r4pt0r Root CA, emailAddress = admin@example.com
Validity
Not Before: Feb 20 17:35:09 2018 GMT
Not After : Feb 18 17:35:09 2028 GMT
Subject: C = PL, ST = lodzkie, O = r4pt0r Test Systems, CN = r4pt0r Intermediate CA, emailAddress = admin@example.com
Subject Public Key Info:
Public Key Algorithm: rsaEncryption
Public-Key: (8192 bit)
Modulus:
00:d4:c9:03:36:4a:dd:3d:ee:ca:bd:c1:d8:fe:51:
<quite a lot of data>
5a:ca:74:74:c8:a2:b2:69:0a:0c:c7:f9:d6:8a:58:
41:45:73:fc:2b
Exponent: 65537 (0x10001)
X509v3 extensions:
X509v3 Subject Key Identifier:
3D:AC:8E:21:79:5A:AD:7B:7C:92:92:65:B7:19:D0:E8:00:0E:50:70
X509v3 Authority Key Identifier:
keyid:29:53:8A:D2:ED:CF:35:C2:BB:A8:12:06:01:74:99:A3:B8:E5:DC:FE
X509v3 Basic Constraints: critical
CA:TRUE, pathlen:0
X509v3 Key Usage: critical
Digital Signature, Certificate Sign, CRL Sign
Signature Algorithm: sha256WithRSAEncryption
15:04:2f:85:89:f6:77:82:c4:60:78:f0:4f:ac:39:ad:15:14:
<quite a lot of data>
7c:71:95:db:16:02:de:01:70:fe:8f:48:94:92:11:1b
$openssl verify -CAfile certs/ca.cert.pem intermediate/certs/intermediate.cert.pem
intermediate/certs/intermediate.cert.pem: OK
$cat intermediate/certs/intermediate.cert.pem certs/ca.cert.pem > intermediate/certs/ca-chain.cert.pem$chmod 444 intermediate/certs/ca-chain.cert.pem
Server certificate
In the following parts, wherever [domain] appears, it should be changed to hostname of our hidden service.
At first, we need to generate certificate request (CSR) on our server:
$openssl genrsa -out [domain].onion.key.pem 4096
Generating RSA private key, 4096 bit long modulus
.................++
..............................................................................++
e is 65537 (0x010001)
$chmod 400 [domain].onion.key.pem$openssl req -config ca/intermediate/openssl.cnf \>-key [domain].onion.key.pem -new -sha256 -out [domain].onion.csr.pem
You are about to be asked to enter information that will be incorporated
into your certificate request.
What you are about to enter is what is called a Distinguished Name or a DN.
There are quite a few fields but you can leave some blank
For some fields there will be a default value,
If you enter '.', the field will be left blank.
-----
Country Name (2 letter code) [GB]:PL
State or Province Name [England]:lodzkie
Locality Name []:
Organization Name [Alice Ltd]:r4pt0r Test Systems
Organizational Unit Name []:
Common Name []:[domain].onion
Email Address []:admin@[domain].onion
Then, we will sign the request with intermediate CA private key, thus issuing the certificate. But first of all, we need to receive the CSR from the server, to intermediate/csr/ directory.
$openssl ca -config intermediate/openssl.cnf -extensions server_cert -days 375 \>-notext -md sha256 -in intermediate/csr/[domain].onion.csr.pem -out intermediate/certs/[domain].onion.cert.pem
Using configuration from intermediate/openssl.cnf
Enter pass phrase for ca/intermediate/private/intermediate.key.pem:
Can't open ca/intermediate/index.txt.attr for reading, No such file or directory
139810167087040:error:02001002:system library:fopen:No such file or directory:crypto/bio/bss_file.c:74:fopen('ca/intermediate/index.txt.attr','r')
139810167087040:error:2006D080:BIO routines:BIO_new_file:no such file:crypto/bio/bss_file.c:81:
Check that the request matches the signature
Signature ok
Certificate Details:
Serial Number: 4096 (0x1000)
Validity
Not Before: Feb 20 17:52:13 2018 GMT
Not After : Mar 2 17:52:13 2019 GMT
Subject:
countryName = PL
stateOrProvinceName = lodzkie
organizationName = r4pt0r Test Systems
commonName = [domain].onion
emailAddress = admin@[domain].onion
X509v3 extensions:
X509v3 Basic Constraints:
CA:FALSE
Netscape Cert Type:
SSL Server
Netscape Comment:
OpenSSL Generated Server Certificate
X509v3 Subject Key Identifier:
DD:6E:E8:78:91:B9:F7:F4:0A:06:3F:D2:38:6D:11:4E:3C:D3:BC:E0
X509v3 Authority Key Identifier:
keyid:3D:AC:8E:21:79:5A:AD:7B:7C:92:92:65:B7:19:D0:E8:00:0E:50:70
DirName:/C=PL/ST=lodzkie/O=r4pt0r Test Systems/CN=r4pt0r Root CA/emailAddress=admin@example.com
serial:10:00
X509v3 Key Usage: critical
Digital Signature, Key Encipherment
X509v3 Extended Key Usage:
TLS Web Server Authentication
Certificate is to be certified until Mar 2 17:52:13 2019 GMT (375 days)
Sign the certificate? [y/n]:y
1 out of 1 certificate requests certified, commit? [y/n]y
Write out database with 1 new entries
Data Base Updated
$ openssl x509 -noout -text -in intermediate/certs/[domain].onion.cert.pem
Certificate:
Data:
Version: 3 (0x2)
Serial Number: 4096 (0x1000)
Signature Algorithm: sha256WithRSAEncryption
Issuer: C = PL, ST = lodzkie, O = r4pt0r Test Systems, CN = r4pt0r Intermediate CA, emailAddress = admin@example.com
Validity
Not Before: Feb 20 17:52:13 2018 GMT
Not After : Mar 2 17:52:13 2019 GMT
Subject: C = PL, ST = lodzkie, O = r4pt0r Test Systems, CN = [domain].onion, emailAddress = admin@[domain].onion
Subject Public Key Info:
Public Key Algorithm: rsaEncryption
Public-Key: (4096 bit)
Modulus:
00:c5:d3:e2:a0:97:b8:4d:67:22:94:c9:be:17:e3:
<quite a lof of data>
49:76:cf
Exponent: 65537 (0x10001)
X509v3 extensions:
X509v3 Basic Constraints:
CA:FALSE
Netscape Cert Type:
SSL Server
Netscape Comment:
OpenSSL Generated Server Certificate
X509v3 Subject Key Identifier:
DD:6E:E8:78:91:B9:F7:F4:0A:06:3F:D2:38:6D:11:4E:3C:D3:BC:E0
X509v3 Authority Key Identifier:
keyid:3D:AC:8E:21:79:5A:AD:7B:7C:92:92:65:B7:19:D0:E8:00:0E:50:70
DirName:/C=PL/ST=lodzkie/O=r4pt0r Test Systems/CN=r4pt0r Root CA/emailAddress=admin@example.com
serial:10:00
X509v3 Key Usage: critical
Digital Signature, Key Encipherment
X509v3 Extended Key Usage:
TLS Web Server Authentication
Signature Algorithm: sha256WithRSAEncryption
b0:92:d9:d5:3b:31:38:f6:b8:51:1f:41:e9:f7:d8:e6:33:67:
<quite a lot of data>
ee:c4:eb:19:86:69:00:26:8d:04:7b:97:0b:8f:f5:76
$openssl verify -CAfile intermediate/certs/ca-chain.cert.pem intermediate/certs/[domain].onion.cert.pem
intermediate/certs/[domain].onion.cert.pem: OK
httpd configuration
Finally, we can use generated files to set up HTTPS encryption on webserver. For this, I am using httpd as it is the most common webserver in use. We need following files:
[domain].onion.key.pem – this is private key, that will be used to set up TLS session
[domain].onion.cert.pem – this is certificate that will prove our identity, so web browser will not display any warnings as long as we will have CA certificate installed
ca-chain.cert.pem – this is chain of certificates we created together with intermediate CA, that consists of both CAs – root and intermediate
Below is httpd configuration file, after enabling TLS:
As can be seen above, all necessary files had been moved to tls directory of our hidden service main directory.
Afterwards, one slight change is needed in torrc file:
HiddenServicePort 443 127.0.0.1:666
From now on, we need to use https://[domain].onion to visit our site, as it is now TLS-encrypted and using port 443, which is default for HTTPS. For convenience, we can set up another httpd vhost on different port, that will redirect all HTTP traffic through HTTPS and link it to port 80, so remembering about https in address will not be necessary. But, it is only optional, so I will leave it as an exercise to the reader.
Firefox
From this point it is useful to have Firefox that is not constantly reminding about insecure connection. To prevent this, we should install CA certificate into Firefox. One remark here: as we are going to hack Firefox to trust our certificate, now our whole browsing through that instance of Firefox relies on our CAs private key. So, it is best to not use the same instance for anything else unless you are really sure, the private keys for both root and intermediate are perfectly secure.
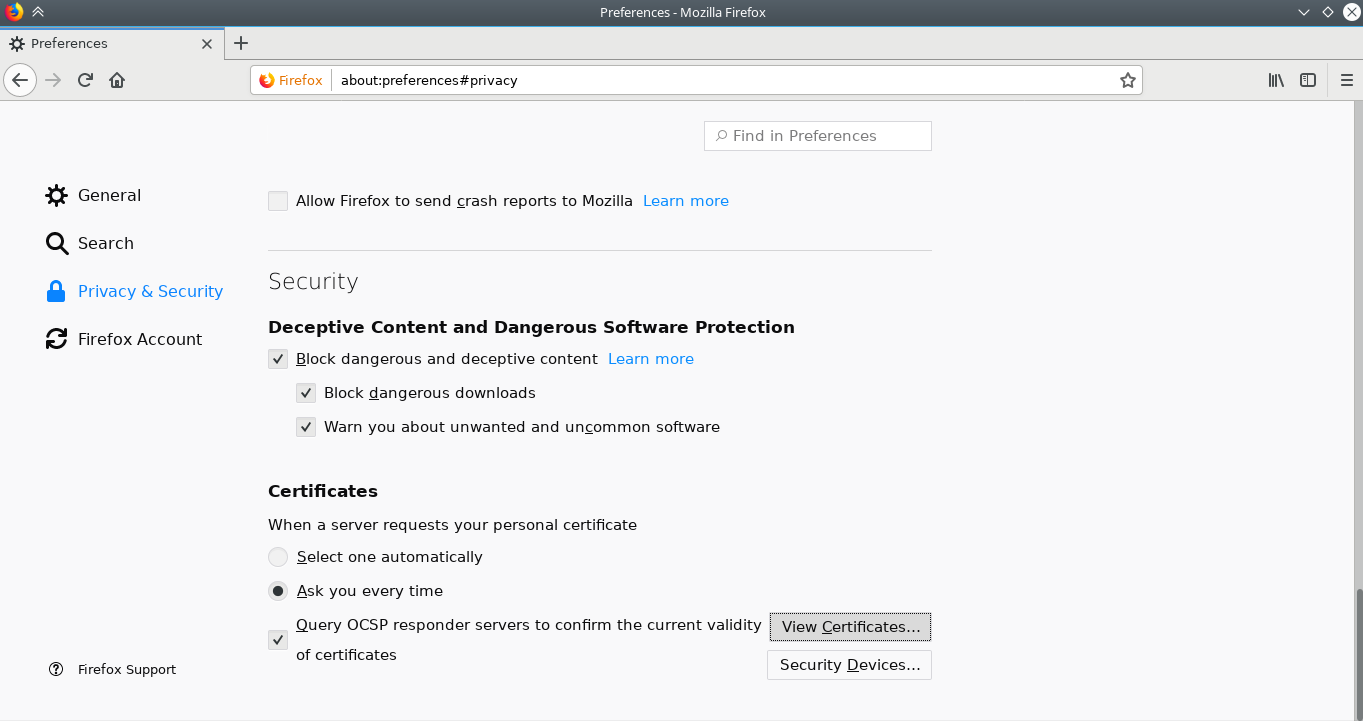
To install the certificate, follow the screenshots below:
On preferences page, got to security and scroll all the way down to View Certificates button
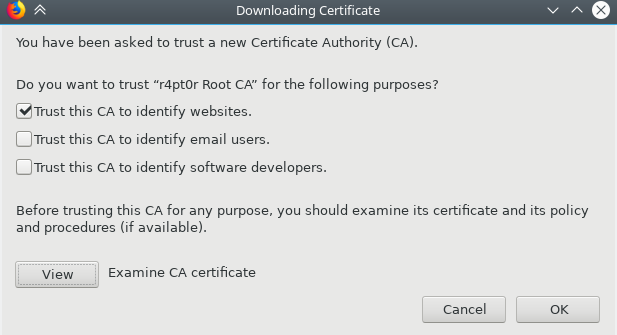
Confirm that this certificate will be able to identify websitesFinally, we are secure and no exclamation mark appears!
As a student I was lucky to have unlimited private Git repositories on Github, since they introduced that to their first paid plan. Unfortunately, I don’t have access to educational e-mail anymore, so I won’t be able to renew the service. This leads to a need to have that feature migrated to somewhere else. Some time ago, I installed cgit and gitolite on my single board computer (SBC). But, because of Github, there was no need to use that. Now it seems like a good replacement to Github’s Developer plan.
Few weeks ago, there was interesting event – Tor Project introduced new version of their Hidden Services – v3, which changes length of hidden service address in .onion domain and disables “feature” enabling some nodes in the network to index all existing service addresses. This seems like a good moment to give it a try and check, how fast (or rather how slow) will be the solution providing git through Tor on few-year-old SBC. By the way, I will show, how to configure things with maximum security in mind.
Disclaimer: I am not a person with deep knowledge of inner workings of Tor network, so I strongly encourage you to read thing or two, about how to use it safely. This article might contain errors that might reveal your identity, especially when used together with not-self-owned hidden services.
Prerequisites
Let’s start with summary of what we will need to make Tor v3 work:
tor in version 0.3.2.9 or higher
alternatively Tor Browser 7.5 or higher
for Android: Orbot and Orfox (at the moment of writing this, there is no support in current version of Orbot, so custom compilation is required – I am using Termux to provide tor binary)
httpd or any other HTTP server, able to provide service with only one vhost on separate TCP port
Because of the way, I am planning to configure hidden service in future, it might be a good idea to set up separate Tor browser at this moment, dedicated to this service, if it is going to be production configuration. If this is just an experiment, this advice could safely be ignored. However it is good to know, how to undo any modifications to the browser that will be done in the next parts.
httpd
What we need to do is to listen on localhost, on some random TCP port. Then we will set up httpd to provide only one virtual host on this custom port. It would be perfect to disable any other vhosts as our hidden service will work also as non-hidden service for local users, so if other service is buggy and allows to connect to other local services (see e.g. DNS rebinding), at least address of our hidden service will be compromised.
Furthermore, httpd must be able to traverse to public_html directory, so every directory from public_html up to root must have execute privilege for http user and directory itself as well as its content must be available (or better owned) by http.
After that and after starting httpd, it should be possible to visit http://localhost:666 via web browser and see content of public_html directory. If this is true, we can move on to tor configuration.
Now, on the first startup of tor, it should create keys for our new hidden service. We can look into /etc/tor/hsv3/hostname to see the .onion address. It is good idea to set key files and hostname file as readable as only user running tor service. In case of service started by systemd, this will probably be tor by default.
After starting tor service (systemctl start tor in case of systemd), we can check if everything works properly by visiting our hidden service with tor-enabled browser (using tor 0.3.2.9 or higher). That’s it.
Firefox for Android
At the time of writing this article there is still no upgrade for Orbot app, providing GUI interface for tor. Because of that, it might be required to use ordinary Firefox to use tor as a proxy, which is generally bad idea for connecting to any hidden services, because of privacy and anonymity. Fortunately, we can live with revealing our identity to ourselves 🙂 so we can do it only this single time.
What we need to change are following configuration options, available under about:config page:
network.proxy.socks to localhost
network.proxy.socks_port to 9050
network.proxy.socks_remote_dns to true
network.proxy.socks_version to 5, if any other (should be default)
network.proxy.type to 1 (0 means no proxy, 5 is system proxy)
Conclusion
Now we are ready to use our hidden service, from both desktop and mobile. Still, we use only HTTP protocol, which is not a big problem, as tor already provides encryption. Neverheless our next goal would be to configure HTTPS. And then we will configure client authentication for ultimate security of our hidden service.