NOTE: This post was imported from my previous blog – v3l0c1r4pt0r.tk. It was originally published on 25th December 2013.
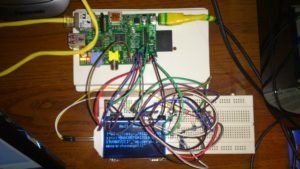
Hi, today I’d like to show you how to connect and use gLCD module with Raspberry Pi as host. The display I have is only bare display without any board not like the one in Adafruit’s offer. It can be powered by 3V3 Raspberry but the display itself needs a bit more power so we will need a few capacitors to build a circuit for that purpose. It will also make the connection a bit complicated (can be seen in the photo on the right). Nevertheless I think that the process is still rather easy.
Overview

As far as I know ST7565 based displays can be connected on two ways: parallel and serial. In case of serial connection, which I used to save few GPIO’s, it is possible to program it using SPI or just only GPIO’s. The display that I have is a bit different than most of the others because it has external backlight, which is additionally single LED so it is very power-saving (15mA). The only problem with that backlight was that the vendor didn’t told anything about parameters of that diode so I needed to figure it out myself.. The second problem while connecting the display itself might be amount of cables that need to be connected when using breadboard. Despite these two facts the whole process should be easy.
Physical connections

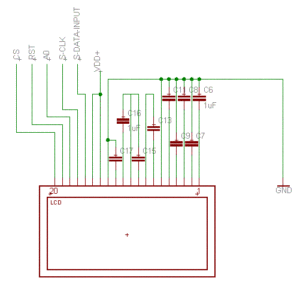
As said before the only step that may be a bit complicated is connecting so called step-up voltage circuit, made of 4 capacitors. The capacitors that we will use are 1uF electrolytic caps. Beside that we need to use another 5 caps (same as before) to connect parallel inputs to ground. So in sum we need 9 of them. Now we only need to connect VDD to 3V3 pin on Raspberry, ground from the schematic on the right with GND pin, SDATA to SMOSI on Pi, SCLK to SCLK and A0, RST and CS to any free GPIO. It is good to remember their numbers cause we will need it in a moment 🙂 It is important to use numbers used by Linux kernel, not wiringPi which has its own names. At last we need to connect the backlight. As said I have ECO backlight so I had to connect mine using 10 Ohm resistor. You can connect it to 3V3 or if you like to have control during runtime use GPIO, just like any other LED.
Configuring the program
Now I have to mention something about a program itself, because depending on how your vendor implemented the things your display will almost surely need a bit different settings. General procedure will look the same on every ST7565-based display. Main differences will be on particular commands during setup procedure.
uint8_t init()
{
  if (!bcm2835_init()) {
    return 0;
  }
  bcm2835_gpio_fsel(LCD_BACK,BCM2835_GPIO_FSEL_OUTP);   //backlight
  bcm2835_gpio_fsel(LCD_A0,BCM2835_GPIO_FSEL_OUTP);   //A0
  bcm2835_gpio_fsel(LCD_RST,BCM2835_GPIO_FSEL_OUTP);    //RST
  bcm2835_gpio_fsel(LCD_CS,BCM2835_GPIO_FSEL_OUTP);   //CS
  bcm2835_gpio_write(LCD_CS,HIGH);        //set CS to high to indicate the bus as free
  bcm2835_gpio_write(LCD_RST,LOW);
  bcm2835_delayMicroseconds(1);
  bcm2835_gpio_write(LCD_RST,HIGH);       //hardware reset
  //setup SPI
  bcm2835_spi_begin();
  bcm2835_spi_chipSelect(BCM2835_SPI_CS_NONE);      //manual CS control
  bcm2835_spi_setClockDivider(BCM2835_SPI_CLOCK_DIVIDER_4); //set speed to 62.5MHz (fastest supported)

  int i;
  bcm2835_gpio_write(LCD_CS,LOW);
  for(i = 0; i < sizeof(initcmd)/sizeof(uint8_t); i++)
    transfer(initcmd[i],0);
  bcm2835_gpio_write(LCD_CS,HIGH);
  bcm2835_gpio_write(LCD_BACK,HIGH);        //turn backlight on

  return 1;
}
I think that the code above should be generally clear. The most important for us is for loop that is executing every byte from initcmd array. Its content will look like that:
const uint8_t initcmd[] =
{
  0xa1,             //screen orientation
  0x41,             //set starting line
  0xc0,             //page count direction
  0xa3,             //1/7 bias
  0x2c,             //vc
  0x2e,             //vc+vr
  0x2f,             //vc+vr+vf
  0x24,             //voltage regulator (0x20-0x27)
  0xa6,             //do not reverse the display
  0xaf,             //display on
  0xa4,             //display from ram
  0x81,             //turn on brightness regulation
  0x18              //set brightness (0x0-0x40)
};
The most important values here are:
- voltage regulator – 0x20 means the darkest, as seen above in my case 0x24 worked
- bias – I saw displays that had 1/9 so you need to make sure how is in yours and set it according to chips documentation linked at the end
You may also want to play with commands like screen orientation, page direction, display reverse or brightness to fit them to your needs. Now you have tell the program which GPIO you used as backlight (if you weren’t using GPIO you will now need to comment out few lines that sets backlight up), CS, RST and A0.
The program itself
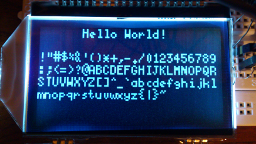
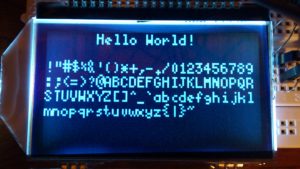
To compile the program you will need to use external library named libbcm2835. It can be installed on ArchLinux ARM by issuing pacman -S libbcm2835 as root. If you are ready you can compile the program by typing: gcc -o lcd lcd.c -lbcm2835 assuming you didn’t change the filename. The simple program I’ve written, basing on the one posted on Gist by tmeissner here and ST7565’s documentation supports transferring single byte (commands too), whole framebuffer, or writing 5×8 single ASCII character or character string. Basing on both codes: mine and Meissner’s I think it is possible to do anything you could think about with that display.
Font creation

Ending slowly it’s time to tell something about fonts. As I said it is possible to simply write characters on the screen. To understand how all that thing works you need to know how the pixels are transfered to the display. The best explanation of the ST7565 display’s work can be in my opinion found here. TL;DR: the whole pixel space is divided into eight, 8-pixel high, horizontal pages divided into 128 columns that are 8 pixels high. If you didn’t understand, try link above. Nevertheless single letter is 8-pixel high and 5-pixel long so we need 5 bytes to store one letter. Its pixel map starts at left, top corner so it’s our (0,0) point and setting LSBof the first byte lights highest pixel. The font that is available in the code is Fixed 5×8 if someone is curious, it’s one of the default fonts in Xorg. To speed up conversion of the font to the display’s format I made simple OpenGL program to do the job for me. The code is of course available to download (check out my github).
DLs
Traditionally, at last some downloads:
- First, and most important: C code of my program
- ST7565 documentation can be found here
