Skip to content

re-ws.pl

ReverseEngineering WorkStation

  • Home
  • Tutorials
  • Random
  • About

Author: Kamil (aka. v3l0c1r4pt0r)

[Import]Airlive WN-151ARM UART pinout & root access

Posted on September 4, 2017 - September 7, 2017 by Kamil (aka. v3l0c1r4pt0r)

NOTE: This post was imported from my previous blog – v3l0c1r4pt0r.tk. It was originally published on 24th November 2015.

Airlive WN-151ARM pinout

For curious ones. Here is pinout of serial connection. As you can see UART pins are at J4 header (should have pin 4 labeled and 1 be square).

J4 header
Num. Function
1 VCC
2 RX
3 TX
4 GND

Edit: Oh, and one more thing: goldpin header, you see in the picture is soldered by me, so do not be surprised if you have to hold wires all the time during the transmission.

Root access

There is also possibility to gain root access without removing the cover and possibly voiding the warranty. You have to connect to router’s AP and enter

http://192.168.1.254/system_command.htm

into your browser (panel authentication required). Now you can execute any command you want with root privileges! So let’s type

/usr/sbin/utelnetd -d &

into Console command field and press Execute button. If everything went well, you should now be able to connect to your router using telnet at its default TCP port 23. After that you should see BusyBox banner and command prompt.

It is worth noting that this hidden console cannot be accessed by unauthorized person, so only router administrator can use this (in theory, in practice there are surely a lot of routers using default credentials and security of httpd binary is unknown).

Posted in RandomTagged Airlive, backdoor, electronics, hacking, hardware, Linux, pinout, UARTLeave a comment

[Import]SDC file format description – Errata

Posted on September 4, 2017 - September 7, 2017 by Kamil (aka. v3l0c1r4pt0r)

NOTE: This post was imported from my previous blog – v3l0c1r4pt0r.tk. It was originally published on 6th November 2015.

Last year, I published a program for Microsoft Dreamspark’s SDC file decryption. Soon after that I wrote article about SDC file format and its analysis. Now it’s time to complete the description with newest data.

This article wouldn’t be written if not the contribution of GitHub’s user @halorhhr who spotted multi-file SDC container and let me know on project’s page. Thanks!

When writing that post year ago, I had no idea what multi-file container really looks like. Any suspicions could not then be confirmed, because it seemed that these files simply where not used in the wild. A days ago situation changed. I got a working sample of multi-file container so I was able to start its analysis.

Real container format

SDC files with different signatures

After quick analysis, I knew that I was wrong with my suspicions. Filename length and encrypted filename strings are not part of a file description. In fact they are placed after them and filename is concatenated string of all filenames (including trailing null-byte). So to sum up filename of n-th element starts at file[n].filename_offset and ends just like any other c-style string.

Whole header structure is like on the sample header on the right. Note that all headers beside 0xb3 one has been already decrypted for readability. In real header the only unencrypted field is header size at the very beginning of the file. 0xb3 sample has unencrypted header and header size is not present in a file. However file name is encrypted in some way, I haven’t figured out as of now. Encryption method is blowfish-compat (the difference between this and blowfish is ciphertext endiannes). Filenames are encrypted once again.

After header, all other data is XORed using key from EDV string and then deflated, so before reading them, you have to inflate and XOR again. Format of data in 0xb3 version is still unknown, however analysis of compressed and file size hints that it may be stored the same way. It is important to note that depending on file signature different configuration of deflater may be needed. It is now known that files older than 0xd1 header, which appears to be newest (because only this one supports files greater than 4 GiB) need to have deflater initialized with

inflateInit2_(&stream,-15,ZLIB_VERSION,(int)sizeof(z_stream));

or equivalent.

Unknowns

This errata does not contain all information needed to support all variations of SDC files. Beside unknowns I mentioned above, there is another variation that uses 0xc4 signature and which I had no sample of. The only trace of its existence is condition in SDM code. Because of that I cannot write support for that type of file. There is also possibility of multi-file containers having 0xb5 or 0xb3 signatures existence. That type of files seems to appear only lately, but it is probable that it existed in the past. Because of having no samples of them I cannot verify that xSDM properly handles them.

So if you have sample of any of variations mentioned here, just send them to me at my email address: v3l0c1r4pt0r at gmail dot com or if you suppose it may be illegal in your country, just send me SDX link or any other hint for me how can I find them.

Other way?

Few days ago, after I started writing this post Github user @adiantek let me know in issues that there is a method to obey SDM in Dreamspark download process. To download plain, unencrypted file you just have to replace ‘dfc=1‘ to ‘sdm=0‘ in a link Dreamspark provided in SDX file. If it true that it works in every file Dreamspark provides, my xSDM project would be obsolete now. However, because Microsoft’s intentions when creating this backdoor (it seems to be created just for debugging) are unknown, I will continue to support the project and fix any future bugs I will be aware of. But now it seems that this project will start to be just proof of concept for curious hackers and will start to slowly die.

Nevertheless, if you have something that might help me or anyone who may be interested in SDC format in future, just let me know somehow, so it will be available somewhere on the internet.

Posted in UncategorizedTagged Dreamspark, English, Reverse Engineering, SDC, SDMLeave a comment

[Import]Decoding Aztec code from polish vehicle registration certificate

Posted on September 4, 2017 - September 7, 2017 by Kamil (aka. v3l0c1r4pt0r)

NOTE: This post was imported from my previous blog – v3l0c1r4pt0r.tk. It was originally published on 1st August 2015.

About a year ago I interested in mysterious 2D code placed in my car’s registration certificate. After quick research on Google it turned out to be even more mysterious because nobody knew how to decode it. There was even no official document like act or regulation that describes the code somehow. People knew that the code is Aztec code and that’s it. Some companies shared web and Android apps to decode this. And all of them was sending base64 to some server and receive decoded data.

Of course for me it wasn’t rewarding so I started my research on it. After initially scanning the code I’ve seen long string that I immediately recognized as base64. The real fun started after that, because stream I’ve got after that was so strange that at first I had no idea what to do. Upon closer examination it was clear that this data is not damaged but encoded in somewhat strange way. Few days later I was almost sure that this is not encoding but rather compression, because some unique parts of stream was easily readable by human. About a month of learning about compression, looking for even most exotic decompression tools and I was left with almost nothing. I had only weak guess on how decompression parameters could be encoded. I gave up…

Polish vehicle registration certificate (source: pwpw.pl)

About a year later I tried one more time. This time I was a bit more lucky. I found a program that decodes the code. Again. But this time was different. I shut down my network connection to make sure. And it worked! So now a bit of reverse engineering and it’s done. I will skip any details because I do not want to piss off the company which created this, even though I was right and I HAD right to do this.

As usual the source code is available on my Github profile. There is also a bit more information about whole scanning/decoding process. If you like to know more technical details about the algorithm or how to decode the data, everything can be found in README file in the repo.

Posted in UncategorizedTagged Aztec, English, Reverse Engineering15 Comments

[Import]CP210x (USB to TTL adapter) for Android devices

Posted on September 4, 2017 - June 13, 2018 by Kamil (aka. v3l0c1r4pt0r)

NOTE: This post was imported from my previous blog – v3l0c1r4pt0r.tk. It was originally published on 22nd August 2014.

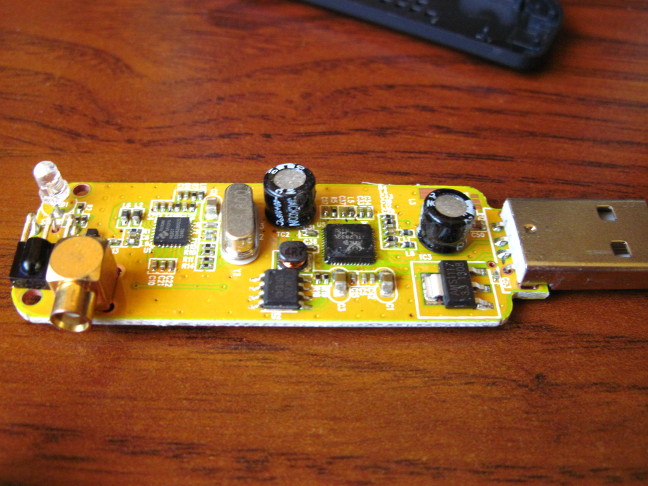
Few days ago, while searching for something interesting I can do with my Android phone I found out that Sony is publishing kernel source of all their (and old SE ones too) ROMs. Beside hacking the kernel itself I was wondering if it is possible to compile additional kernel modules (stock ROM provides only internal WiFi module’s drivers). Well.. it was. The first one I tried was driver of my cheap, Chinese USB to serial adapter based on CP2102 chip.

Prerequisites

  • kernel source – it is important to be the same kernel as the one working on your device. Otherwise it would probably be necessary to boot your system with kernel compiled with source you have and it will not be described in this tutorial. The reason it is important is that between kernel version compatibility is not guaranteed. Different configuration could mess with functionality too (but not tried myself). I have Sony Ericsson device so I downloaded from its official repository.
  • cross-compiler – while compiling programs for Android you definitely should get special version of a compiler because Android is different than usual Linux box so compiler options are different too. The easiest way is to download official NDK which has built-in compilers and easy-to-use script to make standalone toolchain out of them. Same toolchain should also work as compiler for kernel but I haven’t tested it myself. In case it didn’t there is very powerful tool for making your own toolchain for any platform supported by GCC so in practice any you can imagine called crosstool-ng (on Arch available on AUR).
  • uucp source code

Kernel module

We will start with a kernel module. First of all we will unpack our kernel. In case of SE kernel need to be uncompressed and then unpacked so I did:

bzcat 4_1_B_0_431_tar.bz2 | tar -xv
cd kernel

And changed dir to kernel. Next thing I had to do was patching Makefile, because it complained about unused variables. If you are using Sony or SE kernel you probably need to do it too. If so create file named Makefile.patch with your favorite editor, i.e.

vim Makefile.patch

and paste following content:

--- Makefile  2012-05-25 12:07:05.000000000 +0200
+++ Makefile.new  2014-08-20 21:16:50.642703198 +0200
@@ -342,7 +342,6 @@
 KBUILD_CPPFLAGS := -D__KERNEL__

 KBUILD_CFLAGS   := -Wall -Wundef -Wstrict-prototypes -Wno-trigraphs \
-		   -Werror \
 		   -fno-strict-aliasing -fno-common \
 		    -Werror-implicit-function-declaration \
 		    -Wno-format-security \

Now you can patch it with:

patch Makefile < Makefile.patch

Then we can start the compilation process which should end in a second. I assume you have working toolchain in your $PATH and it is prefixed with arm-unknown-eabi- (arm-unknown-eabi-gcc, etc.). If its name is different change all occurrences of arm-unknown-eabi- below.

make mrproper
ARCH=arm CROSS_COMPILE=arm-unknown-eabi- make semc_iyokan_defconfig
ARCH=arm CROSS_COMPILE=arm-unknown-eabi- make prepare
ARCH=arm CROSS_COMPILE=arm-unknown-eabi- make modules_prepare
ARCH=arm CROSS_COMPILE=arm-unknown-eabi- make modules SUBDIRS=drivers/usb/serial CONFIG_USB_SERIAL=m CONFIG_USB_SERIAL_CP210X=m

If everything worked you should have your module compiled in drivers/usb/serial directory. It is worth to note you could compile any other module the same way. It is only important to change SUBDIRS to your module location and ensure it is configured to be built by issuing make menuconfig or setting appropriate CONFIG-* variable to ‘m’.

Now you can copy modules to your devices. With adb it will be:

adb push drivers/usb/serial/usbserial.ko /mnt/sdcard/others
adb push drivers/usb/serial/cp210x.ko /mnt/sdcard/others

We have two modules to copy here since cp210x (and any other serial device driver) depends on usbserial and without it being already in kernel it would be impossible to insert cp210x and furthermore it will give you strange error message (tested :). So now, again with help of ADB, we can insert our modules.

adb shell
su
cd /mnt/sdcard/others
insmod ./usbserial.ko
insmod ./cp210x.ko

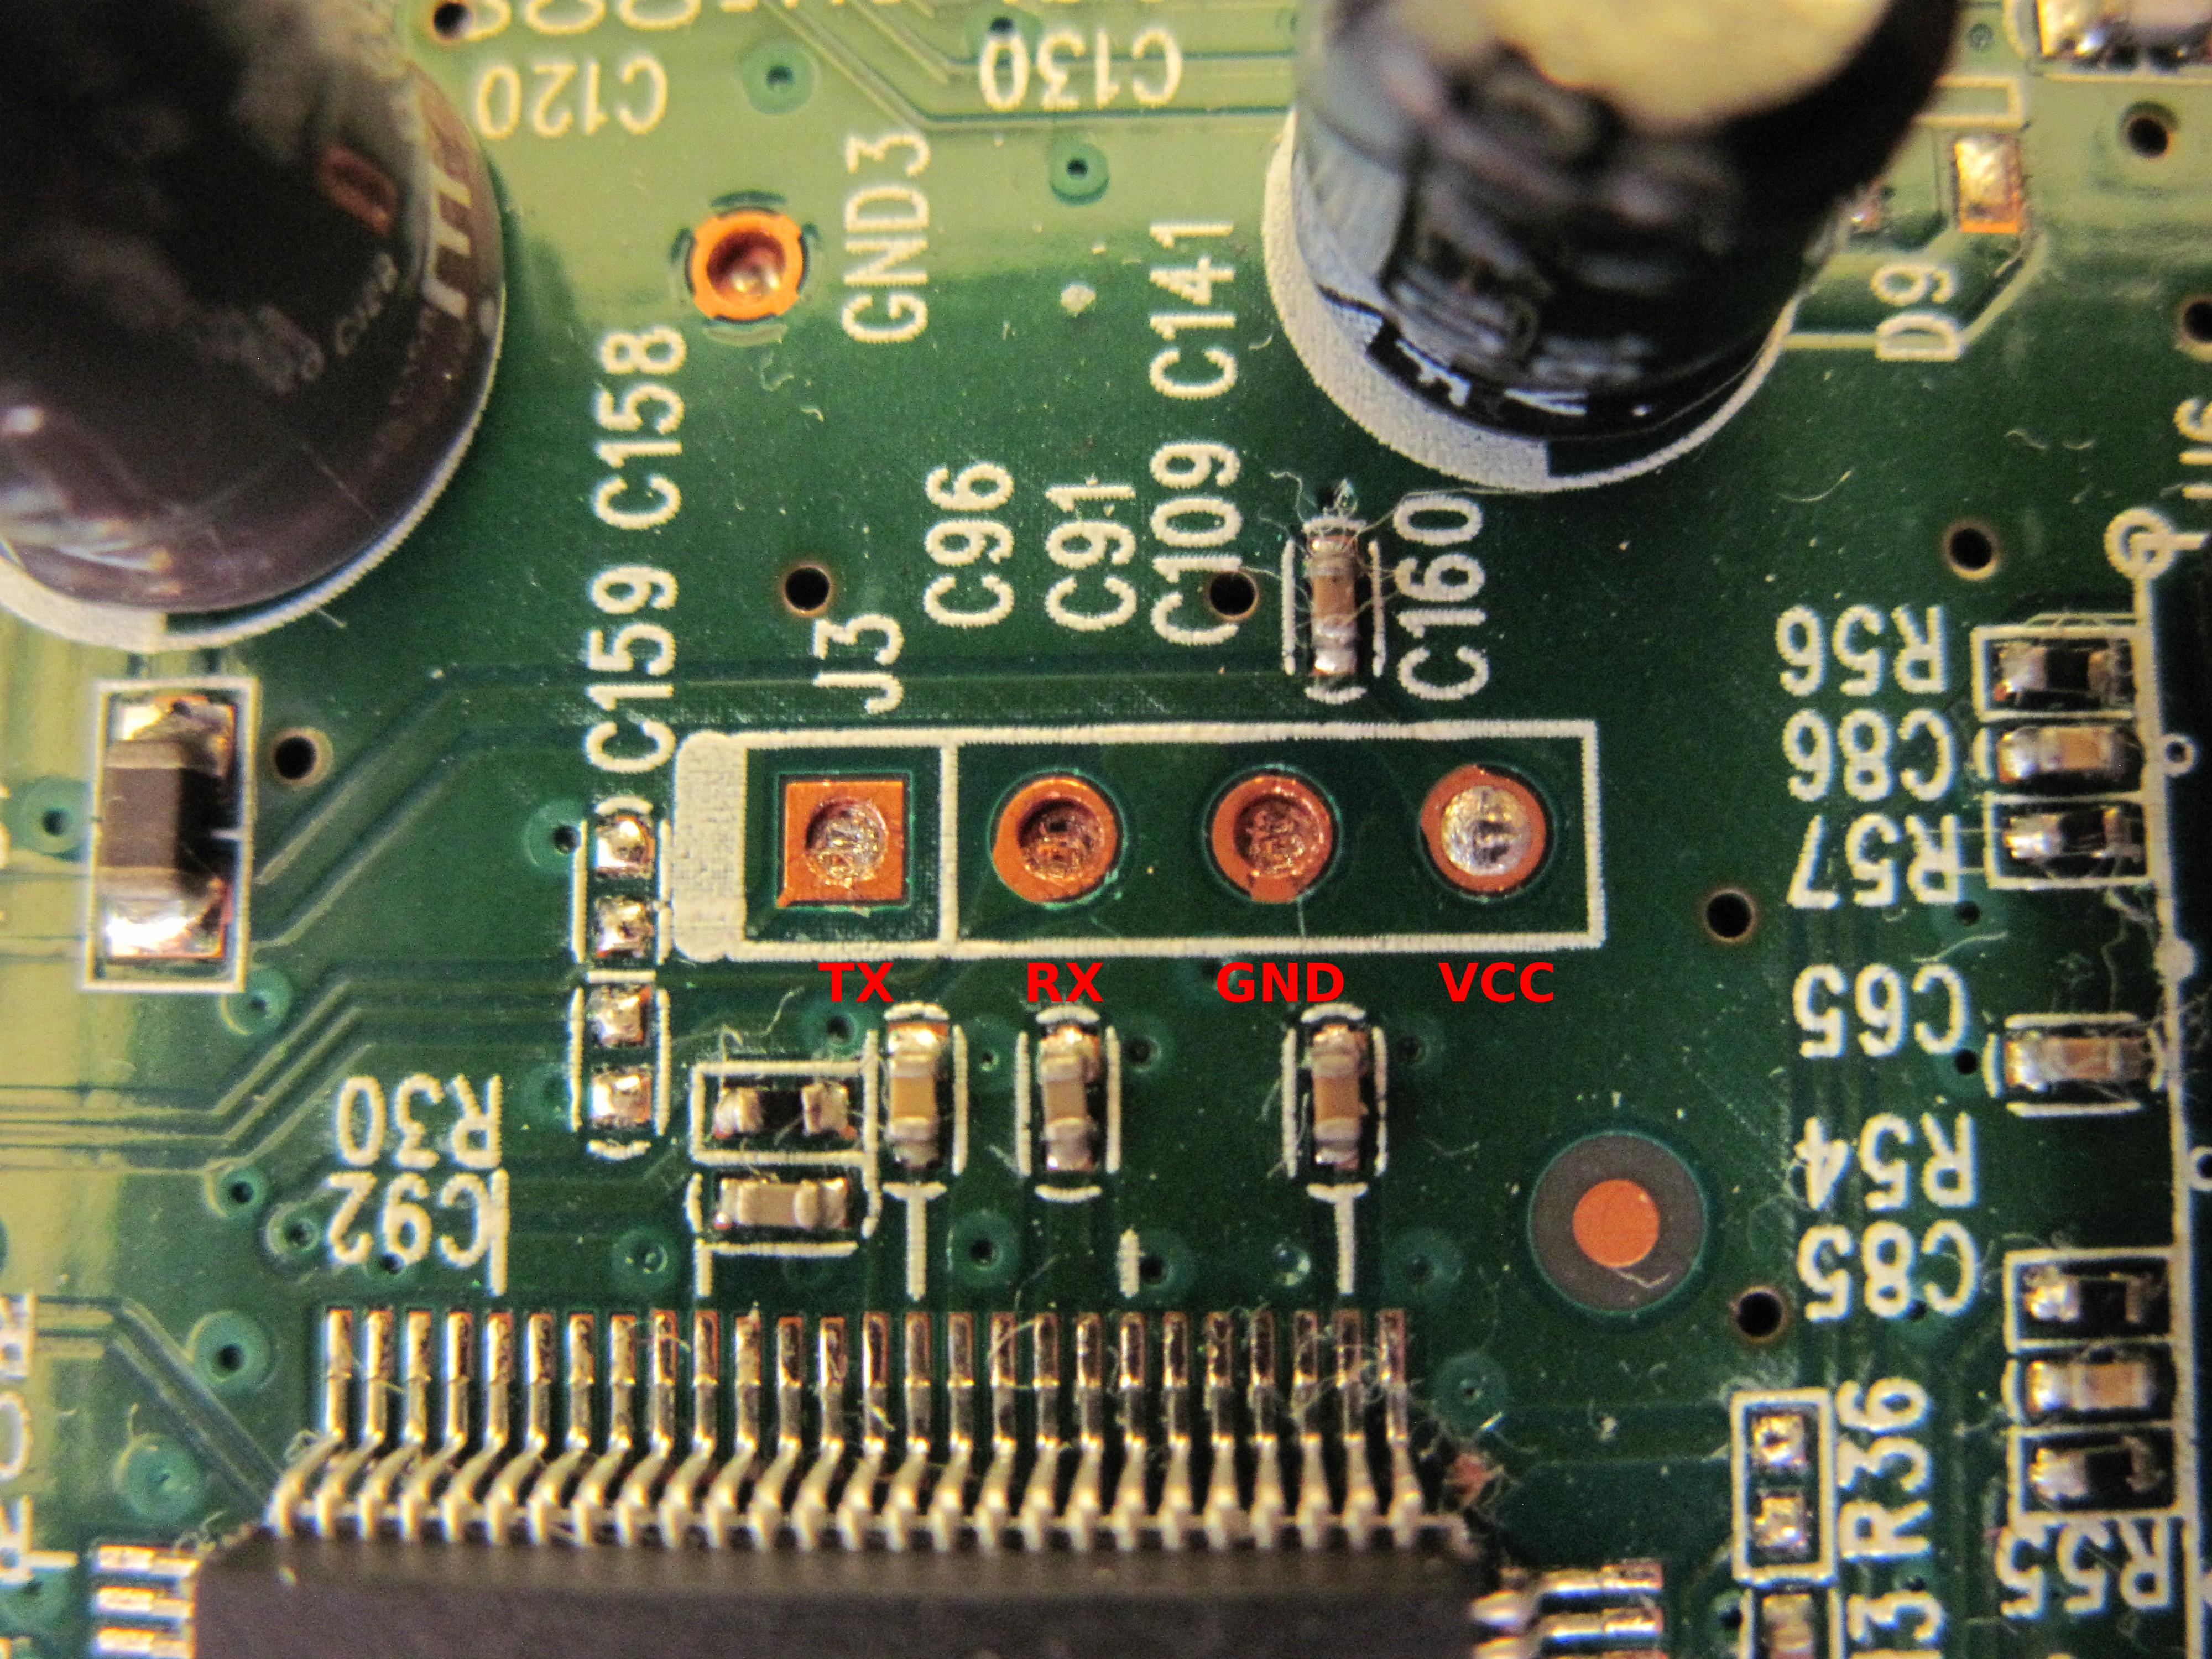
After that you can connect your device and device you compiled module for and test if it works. Serial adapters should create new device file in /dev and, at least with CP210x, it uses ttyUSB* name so you can list it with:

ls -l /dev/ttyUSB*

You can also read from your port as simply as by typing

cat /dev/ttyUSB0

Now after you connect some device talking UART you should see its output.

Program to easily control our port – cu and the rest of uucp package

Warning: in the following steps I assume that you have directories like /data/local/bin and /data/local/etc already on your device. As far as I remember there is only /data/local by default.

At first we need to unpack our source and create some useful directories. Then we will configure our script in build-uucp so we won’t get garbage in source directory and could easily clean things when something goes wrong.

tar -zxvf uucp-1.07.tar.gz
mkdir build-uucp
mkdir install-uucp
cd build-uucp/

Then we will patch our program so it will work on Android out of the box. If we omitted following patch it would be necessary to create configuration file, configure program to read it before work and whole bunch of similar fun. So it is easier to let him know where he could store his files now. You can obviously use the one you want to. If you stay with my config you won’t be able to start cu as normal user which is no problem because by default you won’t have permission to use serial terminal.

Now the procedure is the same as with previous patch. I assume you used policy.h.patch name and the content is:

--- policy.h  2003-05-29 08:08:45.000000000 +0200
+++ policy.h.new  2014-08-20 12:03:45.595405893 +0200
@@ -297,7 +297,7 @@
    systems the lock files are placed in /etc/locks.  On some they are
    placed in /usr/spool/locks.  On the NeXT they are placed in
    /usr/spool/uucp/LCK.  */
-/* #define LOCKDIR "/usr/spool/uucp" */
+#define LOCKDIR "/data/local/etc/spool/uucp"
 /* #define LOCKDIR "/etc/locks" */
 /* #define LOCKDIR "/usr/spool/locks" */
 /* #define LOCKDIR "/usr/spool/uucp/LCK" */
@@ -572,7 +572,7 @@
 /* The name of the default spool directory.  If HAVE_TAYLOR_CONFIG is
    set to 1, this may be overridden by the ``spool'' command in the
    configuration file.  */
-#define SPOOLDIR "/usr/spool/uucp"
+#define SPOOLDIR "/data/local/etc/spool/uucp"
 /* #define SPOOLDIR "/var/spool/uucp" */

 /* The name of the default public directory.  If HAVE_TAYLOR_CONFIG is
@@ -580,7 +580,7 @@
    configuration file.  Also, a particular system may be given a
    specific public directory by using the ``pubdir'' command in the
    system file.  */
-#define PUBDIR "/usr/spool/uucppublic"
+#define PUBDIR "/data/local/etc/spool/uucppublic"
 /* #define PUBDIR "/var/spool/uucppublic" */

 /* The default command path.  This is a space separated list of
@@ -644,21 +644,21 @@
 /* The default log file when using HAVE_TAYLOR_LOGGING.  When using
    HAVE_TAYLOR_CONFIG, this may be overridden by the ``logfile''
    command in the configuration file.  */
-#define LOGFILE "/usr/spool/uucp/Log"
+#define LOGFILE "/data/local/etc/spool/uucp/Log"
 /* #define LOGFILE "/var/spool/uucp/Log" */
 /* #define LOGFILE "/var/log/uucp/Log" */

 /* The default statistics file when using HAVE_TAYLOR_LOGGING.  When
    using HAVE_TAYLOR_CONFIG, this may be overridden by the
    ``statfile'' command in the configuration file.  */
-#define STATFILE "/usr/spool/uucp/Stats"
+#define STATFILE "/data/local/etc/spool/uucp/Stats"
 /* #define STATFILE "/var/spool/uucp/Stats" */
 /* #define STATFILE "/var/log/uucp/Stats" */

 /* The default debugging file when using HAVE_TAYLOR_LOGGING.  When
    using HAVE_TAYLOR_CONFIG, this may be overridden by the
    ``debugfile'' command in the configuration file.  */
-#define DEBUGFILE "/usr/spool/uucp/Debug"
+#define DEBUGFILE "/data/local/etc/spool/uucp/Debug"
 /* #define DEBUGFILE "/var/spool/uucp/Debug" */
 /* #define DEBUGFILE "/var/log/uucp/Debug" */

@@ -669,17 +669,17 @@
 /* The default log file when using HAVE_V2_LOGGING.  When using
    HAVE_TAYLOR_CONFIG, this may be overridden by the ``logfile''
    command in the configuration file.  */
-#define LOGFILE "/usr/spool/uucp/LOGFILE"
+#define LOGFILE "/data/local/etc/spool/uucp/LOGFILE"

 /* The default statistics file when using HAVE_V2_LOGGING.  When using
    HAVE_TAYLOR_CONFIG, this may be overridden by the ``statfile''
    command in the configuration file.  */
-#define STATFILE "/usr/spool/uucp/SYSLOG"
+#define STATFILE "/data/local/etc/spool/uucp/SYSLOG"

 /* The default debugging file when using HAVE_V2_LOGGING.  When using
    HAVE_TAYLOR_CONFIG, this may be overridden by the ``debugfile''
    command in the configuration file.  */
-#define DEBUGFILE "/usr/spool/uucp/DEBUG"
+#define DEBUGFILE "/data/local/etc/spool/uucp/DEBUG"

 #endif /* HAVE_V2_LOGGING */

@@ -692,16 +692,16 @@
    be replaced by the system name (if there is no appropriate system,
    "ANY" will be used).  No other '%' character may appear in the
    string.  */
-#define LOGFILE "/usr/spool/uucp/.Log/%s/%s"
+#define LOGFILE "/data/local/etc/spool/uucp/.Log/%s/%s"

 /* The default statistics file when using HAVE_HDB_LOGGING.  When using
    HAVE_TAYLOR_CONFIG, this may be overridden by the ``statfile''
    command in the configuration file.  */
-#define STATFILE "/usr/spool/uucp/.Admin/xferstats"
+#define STATFILE "/data/local/etc/spool/uucp/.Admin/xferstats"

 /* The default debugging file when using HAVE_HDB_LOGGING.  When using
    HAVE_TAYLOR_CONFIG, this may be overridden by the ``debugfile''
    command in the configuration file.  */
-#define DEBUGFILE "/usr/spool/uucp/.Admin/audit.local"
+#define DEBUGFILE "/data/local/etc/spool/uucp/.Admin/audit.local"

 #endif /* HAVE_HDB_LOGGING */

If you prefer I have it on my gist so you can just issue one command and get it. Then we are patching as usually:

patch ../uucp-1.07/policy.h < policy.h.patch

As mentioned above you can change path of uucp’s files by issuing the following (remember to escape every occurrence of slash with backslash, otherwise it will fail):

sed -i "s/\/data\/local\/etc/[your-path]/" ../uucp-1.07/policy.h

Now you are ready to compile. It can be done with following commands. Your compiler should have same name (at least if you use NDK’s compiler). It is important to note that I had to switch off HAVE_SYSCONF flag since it was causing ugly errors. In my case makescript couldn’t also find a rule to make ftw.o so I had to make it myself. If you have no trouble here, just omit the line after make.

CC=arm-linux-androideabi-gcc AR=arm-linux-androideabi-ar RANLIB=arm-linux-androideabi-ranlib \
../uucp-1.07/configure --prefix=`pwd`/../install-uucp/ --host=arm-linux-androideabi
sed -i "s/#define HAVE_SYSCONF 1/#define HAVE_SYSCONF 0/" config.h
make
cd unix; make ftw.o; cd ..; make
make install
adb push ../install-uucp/bin/cu /mnt/sdcard/others
adb shell
su
cp /mnt/sdcard/others/cu /data/local/bin/

Finally you can test the program with the following and you should be able to talk RS232 with just a phone/tablet!

cu -lttyUSB0 -s115200

where 115200 is the speed the device you connect to transmits.

BTW: uucp have few other tools and by following this tutorial you compiled them all so you can explore them on your own.

Posted in TutorialsTagged Android, English, Linux, tty, UART, Xperia ProLeave a comment

[Import]SDC file format description and security analysis of SDM

Posted on September 4, 2017 - September 7, 2017 by Kamil (aka. v3l0c1r4pt0r)

NOTE: This post was imported from my previous blog – v3l0c1r4pt0r.tk. It was originally published on 22nd June 2014.

As promised in my previous post I’m publishing description of Microsoft’s SDC file format. At the beginning I’d like to explain what SDC file is. SDC is the abbreviation of Secure Download Cabinet/Secure Digital Container. It is used by Microsoft in its Dreamspark program (formerly MSDNAA). Theoretically it is secure container that can be sent using Internet without additional encryption and it should prevent its content from being read by any third party. But that’s theory, let’s look at how it works in practice.

Overview

Firstly let’s look at the packing process. Let’s say we are in Microsoft and we want to “secure” some data. We got some file (or possibly few files) ie. Windows ISO. Next we generate some random number and write it down somewhere. Now we use least significant byte of that number to do XOR on EVERY single byte of that file. Now it may be considered secure 🙂 But some day Microsoft realized it isn’t enough. So what did they do? They used deflate (it is compression method used ie. in zip, gzip). Actually there are two versions of the deflate: one with all headers necessary to realize method of compression by using a tool like binwalk and the other that haven’t any header. Now it is time to combine all the files we have in one. Of course we still need to know some information about them (ie. their size before/after compression, file name). After concatenation we need to count CRC of all the data we have as of now. And finally we need to build a file header. At first we need to write header size. Then starts actual header. It is important because here starts region that will be encrypted. Here is some info about the header itself and then about each file. It is possibly padded with random data (don’t know for sure). Now we need two random 32-byte keys consisting of printable characters. We use first to encrypt filenames and the second to encrypt whole header (beside its size). Finally we concatenate header with the rest and here we have SDC file.

Header format

Sample header

So, we have basic overview on the format, now let’s look at the details. You think it isn’t secure, huh? It would be worse. On the right you can see example header after decryption. First four bytes determine size of the header counting from the next byte. After that we have area encrypted using Blowfish (sometimes referred blowfish-compat) with ECB mode (Electronic CodeBook) using the key stored in edv variable of webpage linked from SDX file. In that area we have 3 dwords describing the header itself. First is header signature. It can be one of the following values: 0xb4, 0xb5, 0xc4, 0xd1. All I know now is that the one with sig = 0xd1 can store files larger than 4 GiB. The next value is interesting one. It looks like it is used to “encrypt” file name in memory so that the static analysis would result in “not found”. As in other cases it is “very advanced encryption”, the same situation as with the whole file: get all the buffer, iterate through it and XOR with the value’s LSB. I have to admit that this one is even does the job. Now we have something called header size. Actually it is probably number of files packed in the container. While reversing I concluded that SDM iterates from 0 to that number, and while this it is reading 0x38 bytes from file. Next it is probably reading fileNameLength and fileName, so whole header must be in format:

<size><description><0x38-bytes-of-file-description><fileNameLength><fileName><0x38...>

and so on until we reach headerSize. Then we have a lot of values not necessary to unpack the file. First of them is offset of file name. While its value is usually 0 (at least in newer headers with blowfish encryption) it is still probably possible to encounter a file with this value greater than zero. If that happened the first thing to do is probably decrypt filename and then move pointer this amount of bytes right. Next value describes file attributes. In fact I didn’t bother about what bit means what attribute, but I suppose it is the same map as in FAT (see my libfatdino library). The next three values are timestamps (creation, access and modification). They all are in Windows 64-bit format called “file time” used for instance by .NET Framework’s DateTime class (DateTime.FromFileTime method; they are number of 100-nanosecond ticks that elapsed since epoch at 1st January 1601 midnight and I suppose that this value is unsigned). That format is very interesting in comparison with another approach of saving date on 64-bit value used on Linux. UNIX timestamp traditionally uses 1st January of 1970 as its epoch and there is usually signed value in use. It isn’t as precise as Windows (counts only seconds) but its end is about 300 billion (10^9) years in future and since it is signed, in past too. Comparing to that Windows’ date will wrap about year 60000 A.C. and cannot store any date before 1601. I know that is still unreachable (like 4 billion computers in 80’s 🙂 but good to know:) After that we have size of the compressed file (be beware of the difference between 64-bit variant and 32-bit one). When we have container with only one file the equation

compressedSize + headerSize + 4 == sdcSize

should always be true. The next one is uncompressed size of the file which can be used to check if the file has been downloaded entirely. After that there is boolean that indicates if file is inflated (compressed), another one-byte value that is probably reserved for future use, one-word padding, which is also interesting because it looks like it contains random numbers (really?). And after that more padding (this time empty) after which we have size of the file name. It may be a bit tricky because the size we have here is the size AFTER decryption and blowfish demands its output to have length divisible by 8. So to decrypt it we need to count next divisor of 8. File name is encrypted using the same method as the header itself and the second key from edv.

Decryption key

Now something more about the keystring (edv). Its format is:

<crc>^^<fileNameKey><headerKey><xorKey>

where:

  • <crc> is a checksum of whole data area of a file (everything beside header size and header)
  • <fileNameKey> is the key used to encrypt file names
  • <headerKey> is the key used to encrypt whole header
  • <xorKey> is the key used to “encrypt” the files

Security of the whole program

People who are familiar with security should already know how insecure is the SDM. For others I have short description.

  1. At first the files itself AREN’T ENCRYPTED in any way. They are only XORed using one byte long key. XOR itself is very weak protection, even with extremely long key. It is due to the fact that many file formats have some of their bytes predictable (this concerns EXEs, ISOs and ZIPs and these are the formats most frequent on Dreamspark). That predictable bytes are usually the beginnings (headers) which usually have so called magic bytes to easily identify file format. So when we know what byte we expect we could try to XOR that byte with actual byte and it is very probable that we get the “encryption” key.
  2. Deflate which is used to hide this patterns from the end user is just compression method. We don’t need anything special to decompress this data.
  3. ECB which is used as blowfish encryption mode is the most insecure mode of block ciphers. It can cause some parts of data to be revealed without actual decryption (see: Wikipedia).
  4. All the data SDM downloads/sends from/to Microsoft’s servers are UNENCRYPTED. Everything: request from the user, SDC itself and decryption keys are all plaintext so with knowledge how SDC looks we can decrypt the file even when it is not intended for us, but we are only in the middle of its road. Furthermore malicious node is able to modify the file on the fly and i.e. put a backdoor into the file, for instance Windows image.

Conclusion

For all the above reasons Secure Download Manager cannot be called a software for securely downloading the files from Microsoft’s servers. All the users using this are the same way INSECURE as users downloading i.e. their copy of Windows from warez sites. Both are susceptible to MITM attacks.

So we still don’t know the answer: why Microsoft is using dedicated software to share their software. The only answer I have is that it is just for making user’s not using Microsoft’s operating system life difficult. In place of decision-making people like the ones in European Commission I would think if this policy is not intended to be only to keep Microsoft’s monopoly for operating system.

Update 20.07.2014

Description updated thanks to GMMan and his great work on reverse engineering the whole program. He also reminded me about older variants of SDC files. I have currently sample(s) of files with 0xb3, 0xb5 and 0xd1 signatures. I know at the moment that there are also signatures 0xa9, 0xb2, 0xb4, 0xc4 and it is possible that they still are reachable through Dreamspark. It is also likely that Microsoft (or Kivuto on Microsoft’s order) will create new format so if you have a sample of file with different header, please let me know in comments!

Posted in UncategorizedTagged cryptography, Dreamspark, English, Reverse Engineering, SDC, SDM1 Comment

[Import]How to bypass Secure Download Manager while downloading from Dreamspark

Posted on September 4, 2017 - December 11, 2017 by Kamil (aka. v3l0c1r4pt0r)

NOTE: This post was imported from my previous blog – v3l0c1r4pt0r.tk. It was originally published on 1st June 2014.

NOTE2: As people are reporting, THIS METHOD DOES NOT WORK anymore. Also I don’t have access to Imagine, so I would not be able to provide any help. Therefore, this article is left only for historic purposes, or for those that have some SDC files downloaded, when it was still valid and have valid decryption keys.

About a month or so ago I had an urgent need to download a copy of Microsoft Windows from Dreamspark. Unfortunately I haven’t Windows installed then so had to do this using Linux. After successful transaction I was given a link to SDX file and program called SDM. It looked that it would be easy. But it wasn’t. Program that I was encouraged to download was archive with .pkg extension. As I discovered few minutes later it was OS X application package. So the next step was to try to download Windows version and try to execute it with help of Wine. It failed. Then I tried to find some tips on the Net. I found a few other people having the same problem. Some of them could download using Wine and some not. For me there was only one solution: do it myself. As you probably guessed that way was a (almost) full success.

Solution

If you already have SDC file please do not skip since you probably still don’t have a key needed to unpack the file. The first step is to open SDX file in your favorite text editor. You will see a link. Open it in a web browser. Now you need to get to page source. The way it can be done depends on your web browser. Now we need to find few strange values in the code. The easiest way to achieve this is to search for keyword ‘edv*’ where * is the number of file you want to download counting from 1 (they are on ‘Items’ list on page you opened). Now you need to copy somewhere values of the following variables: ‘oiopu*’, ‘oiop*’, ‘fileID*’ (*-see above). The last one we need is ‘dlSelect*’ but for that one you need to search cause it is in a different place. Now you can build URL that will let you to file containing two interesting values: file URL and decryption string. This URL’s format is:

http://[SDXdomain]/WebStore/Account/SDMAuthorize.ashx?oiopu=[oiopu]&f=[fileID]&oiop=[oiop]&dl=[dlSelect]

Now you should see XML file that looks similar to this:

<information>
 <oiopua>01234abcd-0123-4567-890a-0123456789ab</oiopua>
 <edv>0123456789^^0123456789QwErTyUiOpAsDfGhJkLzXc0123456789QwErTyUiOpAsDfGhJkLzXc12345678</edv>
 <linkAvailable>1</linkAvailable>
 <errorTextKey/>
 <invokeExternalDownload>0</invokeExternalDownload>
 <fileUrl><![CDATA[http://software.dreamspark.com/dreamspark/ENGLISH/SDCfileName.sdc]]></fileUrl>
</information>

The last step here will be downloading file from fileUrl and saving edv value in file. The important thing is that the file with a key should be named exactly as SDC file with addition of ‘.key’ suffix.

Update:

I’ve just discovered that things are getting a bit different when the file size exceeds 2.0 GB. In that case Dreamspark is splitting file in two or more files. That situation could be easily recognized, because sdc file name’s suffix is: ‘.01.sdc’. In that case you need to try to download file which URL differs by only that one digit, ie. ‘.01.sdc’, ‘.02.sdc’, ‘.03.sdc’. When you encounter last file it should have smaller size than the rest and incrementing that number by one should give you BlobNotFound error.

After downloading all the files they just need to be joined into one. It can be easily achieved with dd, ie.

dd if=pl_windows_7_professional_with_sp1_x64_dvd_u_676944.02.sdc >> pl_windows_7_professional_with_sp1_x64_dvd_u_676944.01.sdc

and then optionally

dd if=pl_windows_7_professional_with_sp1_x64_dvd_u_676944.03.sdc >> pl_windows_7_professional_with_sp1_x64_dvd_u_676944.01.sdc

After that you will get sdc file prepared to unpack.

Unpacking SDC

Now since you have SDC file you can start unpacking it. The previous part was, at least for me, very easy. The problem started when I tried to discover how the file is stored in that container. But don’t worry, I’ve written simple program to do it for you. As of now (1st June) it is still in really early alpha stage and have lot of constraints. It is able to unpack containers that contains only one file packed, doesn’t create any directories, cannot verify file’s checksum and probably few other problems I don’t remember or don’t know about.

If you were searching a bit in the Internet, you probably found out that someone cracked that container in the past. Unfortunately Microsoft changed format since then. It is also possible that in response to this article it will be changed again. To make it a bit harder for them to block my software I’m publishing source code on github and after the process of reverse engineering is finished will write second article describing how things works under the hood and describe sdc file format.

But let’s get back to unpacking. Now you need to download xSDM from github. The newest version can be downloaded by typing

git clone https://github.com/v3l0c1r4pt0r/xSDM.git

in your terminal (of course you need to have git installed). Nevertheless I advice you to download newest tagged release. You can do this by clicking on releases on project page and then choosing the one on the top (or first beta/stable if any) and clicking on “tar.gz”. tar.gz can be unpacked by typing

tar -zxvf xSDM-[tag-name].tar.gz

into console. Then get into xSDM directory by typing

cd xSDM

(or your release directory) and compile the program by standard

./configure
make
make install

where installation is optional. Now to unpack your file you just need to type

src/xsdm [path-to-your-sdc-file]

And that’s it, you should now be able to open file you downloaded. As mentioned above the program is in very early alpha so I cannot guarantee that it will work in any case. If you will encounter any problems feel free to open issue on project page at github.

Posted in TutorialsTagged Dreamspark, English, Linux, Reverse Engineering, SDC, SDM, Windows44 Comments

[Import]TP-Link TD-W8901G UART pinout

Posted on September 4, 2017 - September 7, 2017 by Kamil (aka. v3l0c1r4pt0r)

NOTE: This post was imported from my previous blog – v3l0c1r4pt0r.tk. It was originally published on 31st May 2014.

Some people might wonder: what is the pinout of my router’s serial connection. If you’re a happy owner of TP-Link TD-W8901G and asking that yourself, here is the answer:

TP-Link TD-W8901G’s pinout

In the link below there is also this router’s pinout and moreover author states that to make that port working there is a need to modify some resistors. I have V3.5 of that router and didn’t notice any mod to be necessary.

It is possible to solder goldpins in here and router so far haven’t fried. Of course you can try communicating without stable connection and it even works but after training your fingers while waiting for the firmware download/upload to complete you’ll change your mind, I guarantee:).

PS: that model is the one that was one of the victims of massive DNS changing some time ago so if this is the one you’re using as your bridge to the Internet you may be also interested in this.

PS2: if you have another router and want to find out what is the serial port pinout I recommend going here.

Posted in RandomTagged electronics, English, hardware, router, TP-Link, UARTLeave a comment

[Import]Graphic LCD based on ST7565 chip under Raspberry Pi

Posted on September 4, 2017 - September 7, 2017 by Kamil (aka. v3l0c1r4pt0r)

NOTE: This post was imported from my previous blog – v3l0c1r4pt0r.tk. It was originally published on 25th December 2013.

Hi, today I’d like to show you how to connect and use gLCD module with Raspberry Pi as host. The display I have is only bare display without any board not like the one in Adafruit’s offer. It can be powered by 3V3 Raspberry but the display itself needs a bit more power so we will need a few capacitors to build a circuit for that purpose. It will also make the connection a bit complicated (can be seen in the photo on the right). Nevertheless I think that the process is still rather easy.

Overview

Connected display

As far as I know ST7565 based displays can be connected on two ways: parallel and serial. In case of serial connection, which I used to save few GPIO’s, it is possible to program it using SPI or just only GPIO’s. The display that I have is a bit different than most of the others because it has external backlight, which is additionally single LED so it is very power-saving (15mA). The only problem with that backlight was that the vendor didn’t told anything about parameters of that diode so I needed to figure it out myself.. The second problem while connecting the display itself might be amount of cables that need to be connected when using breadboard. Despite these two facts the whole process should be easy.

Physical connections

Connection scheme

As said before the only step that may be a bit complicated is connecting so called step-up voltage circuit, made of 4 capacitors. The capacitors that we will use are 1uF electrolytic caps. Beside that we need to use another 5 caps (same as before) to connect parallel inputs to ground. So in sum we need 9 of them. Now we only need to connect VDD to 3V3 pin on Raspberry, ground from the schematic on the right with GND pin, SDATA to SMOSI on Pi, SCLK to SCLK and A0, RST and CS to any free GPIO. It is good to remember their numbers cause we will need it in a moment 🙂 It is important to use numbers used by Linux kernel, not wiringPi which has its own names. At last we need to connect the backlight. As said I have ECO backlight so I had to connect mine using 10 Ohm resistor. You can connect it to 3V3 or if you like to have control during runtime use GPIO, just like any other LED.

Configuring the program

Now I have to mention something about a program itself, because depending on how your vendor implemented the things your display will almost surely need a bit different settings. General procedure will look the same on every ST7565-based display. Main differences will be on particular commands during setup procedure.

 
uint8_t init() 
{ 
  if (!bcm2835_init()) { 
    return 0; 
  } 
  bcm2835_gpio_fsel(LCD_BACK,BCM2835_GPIO_FSEL_OUTP);   //backlight 
  bcm2835_gpio_fsel(LCD_A0,BCM2835_GPIO_FSEL_OUTP);   //A0 
  bcm2835_gpio_fsel(LCD_RST,BCM2835_GPIO_FSEL_OUTP);    //RST 
  bcm2835_gpio_fsel(LCD_CS,BCM2835_GPIO_FSEL_OUTP);   //CS 
  bcm2835_gpio_write(LCD_CS,HIGH);        //set CS to high to indicate the bus as free 
  bcm2835_gpio_write(LCD_RST,LOW); 
  bcm2835_delayMicroseconds(1); 
  bcm2835_gpio_write(LCD_RST,HIGH);       //hardware reset 
  //setup SPI 
  bcm2835_spi_begin(); 
  bcm2835_spi_chipSelect(BCM2835_SPI_CS_NONE);      //manual CS control 
  bcm2835_spi_setClockDivider(BCM2835_SPI_CLOCK_DIVIDER_4); //set speed to 62.5MHz (fastest supported) 
 
  int i; 
  bcm2835_gpio_write(LCD_CS,LOW); 
  for(i = 0; i < sizeof(initcmd)/sizeof(uint8_t); i++) 
    transfer(initcmd[i],0); 
  bcm2835_gpio_write(LCD_CS,HIGH); 
  bcm2835_gpio_write(LCD_BACK,HIGH);        //turn backlight on 
 
  return 1; 
} 

I think that the code above should be generally clear. The most important for us is for loop that is executing every byte from initcmd array. Its content will look like that:

const uint8_t initcmd[] =
{
  0xa1,             //screen orientation
  0x41,             //set starting line
  0xc0,             //page count direction
  0xa3,             //1/7 bias
  0x2c,             //vc
  0x2e,             //vc+vr
  0x2f,             //vc+vr+vf
  0x24,             //voltage regulator (0x20-0x27)
  0xa6,             //do not reverse the display
  0xaf,             //display on
  0xa4,             //display from ram
  0x81,             //turn on brightness regulation
  0x18              //set brightness (0x0-0x40)
};

The most important values here are:

  • voltage regulator – 0x20 means the darkest, as seen above in my case 0x24 worked
  • bias – I saw displays that had 1/9 so you need to make sure how is in yours and set it according to chips documentation linked at the end

You may also want to play with commands like screen orientation, page direction, display reverse or brightness to fit them to your needs. Now you have tell the program which GPIO you used as backlight (if you weren’t using GPIO you will now need to comment out few lines that sets backlight up), CS, RST and A0.

The program itself

To compile the program you will need to use external library named libbcm2835. It can be installed on ArchLinux ARM by issuing pacman -S libbcm2835 as root. If you are ready you can compile the program by typing: gcc -o lcd lcd.c -lbcm2835 assuming you didn’t change the filename. The simple program I’ve written, basing on the one posted on Gist by tmeissner here and ST7565’s documentation supports transferring single byte (commands too), whole framebuffer, or writing 5×8 single ASCII character or character string. Basing on both codes: mine and Meissner’s I think it is possible to do anything you could think about with that display.

Font creation

Standard ASCII table and traditional ‘Hello World!’:)

Ending slowly it’s time to tell something about fonts. As I said it is possible to simply write characters on the screen. To understand how all that thing works you need to know how the pixels are transfered to the display. The best explanation of the ST7565 display’s work can be in my opinion found here. TL;DR: the whole pixel space is divided into eight, 8-pixel high, horizontal pages divided into 128 columns that are 8 pixels high. If you didn’t understand, try link above. Nevertheless single letter is 8-pixel high and 5-pixel long so we need 5 bytes to store one letter. Its pixel map starts at left, top corner so it’s our (0,0) point and setting LSBof the first byte lights highest pixel. The font that is available in the code is Fixed 5×8 if someone is curious, it’s one of the default fonts in Xorg. To speed up conversion of the font to the display’s format I made simple OpenGL program to do the job for me. The code is of course available to download (check out my github).

DLs

Traditionally, at last some downloads:

  • First, and most important: C code of my program
  • ST7565 documentation can be found here

Posted in TutorialsTagged electronics, English, hardware, LCD, Linux, Raspberry Pi1 Comment

[Import]Using GNU Radio Companion – simple FM radio tutorial

Posted on September 4, 2017 - September 6, 2017 by Kamil (aka. v3l0c1r4pt0r)

NOTE: This post was imported from my previous blog – v3l0c1r4pt0r.tk. It was originally published on 1st November 2013.

This post is the second part of the Instructable mentioned on the previous post. That’s tutorial on how to make simple FM radio using GRC. That task is in my opinion the simplest project that can be made using GRC so it’s in fact beginners guide to GNU Radio which is really capable software. I hope that it is only the first my project using that software.

It isn’t hard to find GRC projects that implements FM radio functionality, that’s a fact. But when it comes to reproduce them so they are working just like SDR# you’d realize it’s a bit harder task. At least I did. I found about a three such projects but there was never any included project file and the only materials was video or pictures. I admit the video has pretty good explanation but it still wasn’t enough. The rest was even worse. They were only blog posts with few screen shots and short description. So finally to reproduce functionality of SDR#’s FM radio I had to think on my own. And after few hours I did what I tried to do.

A bit of theory

RTL-SDR Source Properties

But let’s start at the beginning. The first thing that you need to do to start creating your own FM receiver using GRC is to find FM station that can be received without disruptions so you can check if your program works as well as i.e. SDR#. It can be done with help of SDR# and when you found one you are ready to learn some theory about FM signal processing. In fact it could be omitted, but in my opinion it is better to know a bit. I personally am not any specialist in radio theory so it will be really simple and I might be wrong somewhere so if you find any mistake in that what I will write here just let me know in comments.

The simplest FM radio consists of few elements:

  • signal source – in our case it would be RTL-SDR dongle
  • low pass filter
  • WBFM demodulator
  • audio output – your PC’s sound card

There can be few other elements depending on input and output sample rate, if it will be possible to match them using only above elements there won’t be any other. So our task will be getting signal using RTL-SDR, passing it through low pass filter and FM demodulator and outputting on PC’s sound card. Meanwhile we will also need to match the sample rate of the input to the one of the output (2 MHz in to 48 KHz out). All elements of this circuit can be found by writing part of its name while list on the right is selected. Element’s names are the ones used as section header below.

RTL-SDR source

Low Pass Filter Properties

Our signal input. We need to set its sample rate to 2M. It can be done by editing samp_rate variable and setting its value to 2e6. We need also to set the frequency of the station we want to receive. It is good practice to add every value that might be changed in the future as standalone variable. This can be done by adding Variable block from Variables category or, if you want to have possibility to edit it during the runtime block named WX GUI Slider or WX GUI Text Box and then just writing variable name as value in block’s properties.

Rational Resampler

Now we need to convert sample rate from 2M (samp_rate) to 500K which I realized is the best value for low pass filter’s input rate. To do that we need to add another variable, named i.e. quadrature, set its value to 500e3 (means: 500K). With that we need to add rational resampler’s block and set its decimation value to int(samp_rate/quadrature). Of course its input on the schematic should be connected to output of RTL-SDR Source (can be achieved by clicking on blue out on one block and then blue in on another).

Low Pass Filter

The next step is to filter out frequencies other than the one we centered in th previous step. In that task we will use a low pass filter block. We here set cutoff frequency to 100e3. This is because that’s standard band’s width. I don’t know what correct value for transition width should be, but trying to change that I found that the higher value the better so it’s finally set to 1M. Obviously it should be connected to resampler’s output.

WBFM Receive

Volume slider Properties

Now we could do the nearly final and the most important step: placing the FM demodulator. In my case its quadrature rate equals 500k (that’s the same value as before so I set this to the value of quadrature variable). I don’t know if it could be changed to something else so if you are not sure just leave it as is. In that setting it should work.

Next Rational Resampler and Multiply Const

These elements’ job is to match the signal’s rate to the one supported by sound card and provide volume regulation. At first we need to convert rate from 500k to 48k so we need to decimate by 500 and then multiply by 48. In the second block we set const to volume. Now we can create variable or place WX GUI Slider with variable name set to volume. As you can see here color of WBFM demodulator is different than rational resampler’s and multiplier’s in and out. To change that you need to select them and use up and down arrows on your keyboard.

Audio Sink

That one’s function is to output signal on our sound card. Now its only required to edit its rate and choose 48k from a drop down list and that’s it! If you don’t have that option just choose the biggest value and edit value in rational resampler and it should work. Now you should be able to execute your program and test if it works. To hear anything it will probably be required to increase volume to about 50.

Finally: some links

If you don’t know how some part has been done or what value should have a particular variable below you can download projects that I’ve made first learning to use GRC myself and then preparing this tutorial. There is one project presented here and one made earlier.

Finished FM radio schematic

Posted in TutorialsTagged English, FM, GNU Radio, GRC, hardware, Linux, radio, RTL-SDR, SDR14 Comments

[Import]RTL-SDR under Arch Linux – getting started

Posted on September 4, 2017 - September 5, 2017 by Kamil (aka. v3l0c1r4pt0r)

NOTE: This post was imported from my previous blog – v3l0c1r4pt0r.tk. It was originally published on 1st November 2013.

First post about hardware was to be something different. Unfortunately it looks like that project already failed so it probably will never be published. Instead I’m starting, I hope series of posts, about cheap Software Defined Radio dongles based on RTL28xxU chips. This post will be short introduction to the topic of RTL-SDR and it will mostly be the same as my Instructable here.

If you get here I imply that you already know what SDR is. If you don’t take a look at Instructable linked above. Getting one is for yourself should be easy. There are lots of offers on ebay that have names of chips included in the title so you should just search for rtl-sdr and i.e. R820T. That chip is one of the most capable and cheap in contrast to E4000.

Installation

The only things we will need here is some Linux distro and of course a tuner. As Linux I recommend Arch, because of availability of packages required and simplicity of its installation. There would be good if you have better antenna for the tuner and in that case you should also have adapter to standard antenna connector.

If you are ready you can now connect your dongle to PC and check using dmesg | tail or journalctl if it is has been detected by your system and if it contains appropriate chips.

If you chose the one with R820T it is probably required to disable default dvb_usb_rtl28xxu drivers, because, at least in my case, after disconnecting the dongle system hangs and the reason is for sure fault of that particular driver. You can disable it by creating new .conf file in /etc/modprobe.d directory. It could be done i.e. by typing # nano /etc/modprobe.d/blacklist.conf in console. The file should contain one line: blacklist dvb_usb_rtl28xxu. You also need to add that file to FILES variable in /etc/mkinitcpio.conf so it looks like that:FILES=”/etc/modprobe.d/blacklist.conf” and generate new initrd file by using # mkinitcpio -p linux. Now after restarting your computer everything should be OK.

Now we will need to install few packages to make RTL-SDR up and running. rtl-sdr and sdrsharp-svn are needed for basic functionality. You probably also want to install gnuradio and gr-osmosdr-git to make more advanced things like analysis of digital signal transmitted at 433 MHz. rtl-sdr is the main driver and can be installed on Arch from community repo:

# pacman -S rtl-sdr
SDR# receiving FM station

There is also its git version available on AUR as rtl-sdr-git. SDR# is the program that offers basic capability to decode FM and AM radio and have easy to learn GUI so using it is the best for beginners. It is available on AUR as sdrsharp-svn.

The most capable software for RTL-SDR is GNU Radio and its graphical tool: GNU Radio Companion. It is also available on AUR (name: gnuradio). It is also required to install package gr-osmosdr-git from AUR in order to use RTL-SDR dongle as source in GRC. Its usage tutorial is available in the next post and as continuation of Instructable mentioned at the beginning of this post.

Now if you already installed all the required software you can try to find a radio station at about 100 MHz to check if everything is working fine. As mentioned earlier you could be able to listen to only the strongest stations on the default antenna. Finding one good signal will be useful in the next tutorial. At the end I’m enclosing screenshot of SDR# with settings proper to receive FM station.

Posted in TutorialsTagged English, hardware, Linux, radio, RTL-SDR, SDR1 Comment

Posts navigation

Older posts
Newer posts

Tags

Android assembly busybox C CAN can-hacking cc-factory cmake compiler docker Dreamspark electronics English gcc hacking hardware JavaCard JCOP kernel KiCAD library Linux PC PCB pinout PKI polski programming Python radio Raspberry Pi Reverse Engineering RTL-SDR SDC SDM SDR smart card software tor tty UART UEFi Windows X.509 Xperia Pro

Recent Posts

  • PHP build for use bundled in Android applications
  • Running graphical apps inside Docker containers
  • Plugin architecture demo for Python projects
  • Authorizing adb connections from Android command line (and making other service calls from cli)
  • How to recover torrent from rtorrent meta files

Recent Comments

  • pomi on Playing with GF-07 GPS device
  • pomi on Playing with GF-07 GPS device
  • Hamdy Abumgata on Playing with GF-07 GPS device
  • Mousum Gogoi on Playing with GF-07 GPS device
  • Eason on Sniffing USB traffic with DSLogic logic analyzer into pcap file

Categories

  • News
  • Random
  • Reversing LKV373A
  • Setting up new v3 Hidden Service with ultimate security
  • Tutorials
  • Uncategorized
  • Understanding JCOP

Links

  • Me @ github
  • LKV373A Wiki
  • DevTomek

Archives

  • December 2024
  • November 2024
  • May 2024
  • July 2023
  • October 2022
  • August 2022
  • July 2021
  • June 2021
  • May 2021
  • December 2020
  • November 2020
  • October 2020
  • August 2020
  • December 2019
  • November 2019
  • October 2019
  • August 2019
  • July 2019
  • February 2019
  • November 2018
  • October 2018
  • June 2018
  • May 2018
  • March 2018
  • February 2018
  • January 2018
  • December 2017
  • November 2017
  • September 2017

Meta

  • Log in
  • Entries feed
  • Comments feed
  • WordPress.org
Proudly powered by WordPress | Theme: micro, developed by DevriX.