NOTE: This post was imported from my previous blog – v3l0c1r4pt0r.tk. It was originally published on 24th November 2015.

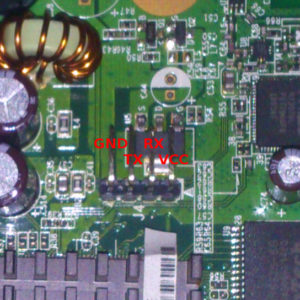
For curious ones. Here is pinout of serial connection. As you can see UART pins are at J4 header (should have pin 4 labeled and 1 be square).
| Num. | Function |
|---|---|
| 1 | VCC |
| 2 | RX |
| 3 | TX |
| 4 | GND |
Edit: Oh, and one more thing: goldpin header, you see in the picture is soldered by me, so do not be surprised if you have to hold wires all the time during the transmission.
Root access
There is also possibility to gain root access without removing the cover and possibly voiding the warranty. You have to connect to router’s AP and enter
http://192.168.1.254/system_command.htm
into your browser (panel authentication required). Now you can execute any command you want with root privileges! So let’s type
/usr/sbin/utelnetd -d &
into Console command field and press Execute button. If everything went well, you should now be able to connect to your router using telnet at its default TCP port 23. After that you should see BusyBox banner and command prompt.
It is worth noting that this hidden console cannot be accessed by unauthorized person, so only router administrator can use this (in theory, in practice there are surely a lot of routers using default credentials and security of httpd binary is unknown).
